Security of Information, Threat Intelligence, Hacking, Offensive Security, Pentest, Open Source, Hackers Tools, Leaks, Pr1v8, Premium Courses Free, etc

  • Penetration Testing Distribution - BackBox

    BackBox is a penetration test and security assessment oriented Ubuntu-based Linux distribution providing a network and informatic systems analysis toolkit. It includes a complete set of tools required for ethical hacking and security testing...
  • Pentest Distro Linux - Weakerth4n

    Weakerth4n is a penetration testing distribution which is built from Debian Squeeze.For the desktop environment it uses Fluxbox...
  • The Amnesic Incognito Live System - Tails

    Tails is a live system that aims to preserve your privacy and anonymity. It helps you to use the Internet anonymously and circumvent censorship...
  • Penetration Testing Distribution - BlackArch

    BlackArch is a penetration testing distribution based on Arch Linux that provides a large amount of cyber security tools. It is an open-source distro created specially for penetration testers and security researchers...
  • The Best Penetration Testing Distribution - Kali Linux

    Kali Linux is a Debian-based distribution for digital forensics and penetration testing, developed and maintained by Offensive Security. Mati Aharoni and Devon Kearns rewrote BackTrack...
  • Friendly OS designed for Pentesting - ParrotOS

    Parrot Security OS is a cloud friendly operating system designed for Pentesting, Computer Forensic, Reverse engineering, Hacking, Cloud pentesting...
Showing posts with label Security. Show all posts

Friday, May 26, 2017

A smart gateway to stop hackers and Malware attacks - FalconGate


A smart gateway to stop hackers, Malware and more...

Motivation

Cyber attacks are on the raise. Hacker and cyber criminals are continuously improving their methods and building new tools and Malware with the purpose of hacking your network, spying on you and stealing valuable data. Recently a new business model has become popular among hackers: the use of Ransomware to encrypt your data and ask for a ransom to unlock it. These attacks have extended also to the Internet of Things (IoT) devices since many of them are vulnerable by design and hackers can leverage them to compromise other devices in your network or launch DDoS attacks towards other targets. Traditionally securing a network against such attacks has been an expensive item which could be afforded just by medium to large companies. With FalconGate we're aiming to change this and bring "out of the box" security for free to people, small businesses and anyone else in need.

Features

FalconGate is an open source smart gateway which can protect your home devices against hackers, Malware like Ransomeware and other threats. It detects and alerts on hacker intrusions on your home network as well as other devices misbehaving and attacking targets within your network or in the Internet.
Currently FalconGate is able to:
  • Block several types of Malware based on open source blacklists (see detailed list in file intel-sources.md )
  • Block Malware using the Tor network
  • Detect and report potential Malware DNS requests based on VirusTotal reports
  • Detect and report the presence of Malware executables and other components based on VirusTotal reports
  • Detect and report Domain Generation Algorithm (DGA) Malware patterns
  • Detect and report on Malware spamming activity
  • Detect and report on internal and outbound port scans
  • Report details of all new devices connected to your network
  • Block ads based on open source lists
  • Monitor a custom list of personal or family accounts used in online services for public reports of hacking

Getting Started

FalconGate was built on top of other open source software so it has multiple dependencies which must be configured correctly for it to work. The fastest way to get FalconGate up and running is to deploy one of the supported system images from our downloads page .

Supported Platforms

Currently FalconGate has been successfully tested and implemented on Raspberry Pi (RPi 2 model B) and Banana Pi (BPI-M2+) using Raspian Jessie Lite as base image.
Jessie Lite for RPi
Jessie Lite for BPi
It should be compatible with other Debian ARM images as well but this has not been tested yet.

Prerequisites

FalconGate has a number of software dependencies:
  • Bro IDS
  • Python 2.7
  • Nginx
  • Dnsmasq
  • Exim
  • PHP
It depends also on several Python modules (see requirements.txt file for details)

Other dependencies

The devices's malware detection can be enhanced with the utilization of VirusTotal's personal free API
Currently FalconGate uses have i been pwned public API to detect whether credentials and/or other data from personal accounts have been stolen by hackers from third party sites.

Deploying FalconGate from a supported image

This is the fastest way to get FalconGate up and running in your network.
  • Download the correct system image for your device from the downloads page .
  • Extract the image to a folder in your computer.
  • Write the image to your SD card.
You can use the guides below as reference for Raspberry Pi:
Linux
Mac OS
Windows
  • Insert the SD card in your device and plug it to any available ethernet port in your router.
  • Power on your device and wait few minutes until it will acquire the correct configuration for your network.
  • Login to your router and disable its DHCP server function
  • Login to FalconGate's web app and configure the email address(es) to be used as recipients for alerts and your VirusTotal API key
https://[FalconGate IP address]
Username: admin
Password: falcongate
Usually FalconGate will assign to its administration interface an IP ending in ".2" (e.g. 192.168.0.2) which is derived from the network's gateway IP Change the default password after the first logon to the application
  • Navigate to the "Configuration" page and fill in the correct fields
This configuration it's not mandatory but highly desired if you want to unleash FalconGate's full power. In order to obtain a free VirusTotal API key you must register at ( https://www.virustotal.com/ ).

Installing FalconGate from source

Follow the steps below to configure your device and install FalconGate from this repository.
  • Download and install the OS image to your Raspberry Pi or Banana Pi device
This is well documented in multiple sources out there.
  • Connect to your device via SSH
$ ssh pi@<IP assigned to your RPi>
  • Install Git if you don't have it yet
$ sudo apt-get update
$ sudo apt-get install git
  • Clone FalconGate's repository to a local folder
$ cd /opt
$ sudo git clone https://github.com/A3sal0n/FalconGate.git
  • Run the installation script inside FalconGate's folder
$ cd FalconGate/
$ sudo python install.py
Now you can go for a walk and prepare a coffee or any other beverage of your choice because the installation usually takes some time. The script will print the progress to the console.
The script should finish without issues if you're using the supported platforms. If you're attempting to install FalconGate experimentally to a new hardware platform/OS and you get some errors during the installation you could try to correct the issues manually and continue to execute the steps listed in the installation script.
  • Login to your router and disable its DHCP server function
FalconGate was designed to work connected to a router over ethernet. It does not replaces the functions of your router. Instead it becomes a layer of security between your devices and your router. Disabling your router's DHCP allows FalconGate to become the new gateway for all the devices connected to the same router in your VLAN.
  • Reboot your device to apply all the configuration changes
  • Login to FalconGate's web app and configure the email address(es) to be used as recipients for alerts and your VirusTotal API key

Deployment

Some important considerations to keep in mind when deploying FalconGate to a real environment: home or production network.
  • Change the default SSH password in your Raspberry Pi or Banana Pi devices
  • Regenerate the openssh-server certificates for SSH encryption

Limitations

Currently the RPi 2 model B and the Banana Pi M2+ have both a single ethernet interface so the traffic forwarding in the gateway it's done using this single interface. This has an impact in networks with fast Internet connection (e.g. > 50Mb/s). However it's still good enough for the home networks of many people's and even some small businesses.


Share:

Saturday, May 6, 2017

The Hacker's ToolBox - PloitKit


PloitKit is a Python based GUI tool designed as one-stop for all other softwares. I was facing these kinds of problem, when I need to switch to different system, or I lost my pen-drive. I have to go to google, and search every tool and download every tool and so on. So I decided to create a tool, in which I just click and click and tool is there.
I have added more than 900+ tools in this tool, but only 400+ is available now, to test will this tool work, if it works I'll make it available for everyone.

Features
  1. Auto-Update - No need to come over here, and look for new version every time.
  2. Better Error Handling - Some tools may cause error, that's why I added this option.
  3. Graphical Interface - For just click & click.
  4. Malware Protectiong - All tools are downloaded from their original source, so no malwares or any viruses.
  5. Multi-Platform - Many tools are for designed differently for Mac, Windows & Linux, so I added option for that. Choose your platform and you're good to go.
  6. Better organised - Everything is better organised nothing like search everything, and all that mess.
I believe that, nothing can't be perfect, So I added option to report a tool, or send me suggestions about any new tool, I should add.

Usage
git clone https://github.com/rajeshmajumdar/PloitKit.git

Windows
ploitkit.py

UNIX or Mac
python ploitkit.py


Share:

Saturday, March 25, 2017

iOS App Security Assessment Tool - idb


idb is a tool to simplify some common tasks for iOS app security assessments and research. Please see the Documentation for a more detailed summary of each function.

Features
  • Assessment Setup
    • SSH port forwarding
    • Installation of helper utilities
  • App Information
    • Bundle information
    • Registered URL Schemes
    • Platform and SDK Versions
    • Data folder location
    • Entitlements
  • Data Storage
    • List plist files and data protection class
    • List sqlite files and data protection class
    • List Cache.db files and data protection class
    • Full app file system browser
      • Browse files
      • Download/view files
      • Check data protection
      • Rsync folders and keep git revisions
    • Dump iOS keychain
  • Binary Analysis
    • Check for encryption
    • Check for protections (ASLR/PIE, DEP, ARC)
    • List shared libraries
    • Extract strings in app binary
    • Dump class and method signatures
  • IPC
    • List URL handlers
    • Invoke and fuzz URL handlers
    • Monitor the iOS pasteboardA
  • Other Tools
    • Check for iOS backgrounding screenshot
    • Install certificates
    • Edit /etc/hosts file

Share:

Thursday, January 12, 2017

An Intentionally Vulnerable Machine for Exploit Testing - Metasploitable3


Metasploitable3 is a VM that is built from the ground up with a large amount of security vulnerabilities. It is intended to be used as a target for testing exploits with metasploit .
Metasploitable3 is released under a BSD-style license. See COPYING for more details.

Building Metasploitable 3
System Requirements:
  • OS capable of running all of the required applications listed below
  • VT-x/AMD-V Supported Processor recommended
  • 65 GB Available space on drive
  • 2.5 GB RAM
Requirements:
NOTE: A bug was recently discovered in VirtualBox 5.1.8 that is breaking provisioning. More information here .
NOTE: A bug was recently discovered in Vagrant 1.8.7 on OSX that is breaking provisioning. More information here .
To build automatically:
  1. Run the build_win2008.sh script if using bash, or build_win2008.ps1 if using Windows.
  2. If the command completes successfully, run 'vagrant up'.
  3. When this process completes, you should be able to open the VM within VirtualBox and login. The default credentials are U: vagrant and P: vagrant.
To build manually:

1. Clone this repo and navigate to the main directory.
2. Build the base VM image by running packer build windows_2008_r2.json . This will take a while the first time you run it since it has to download the OS installation ISO.
3. After the base Vagrant box is created you need to add it to your Vagrant environment. This can be done with the command vagrant box add windows_2008_r2_virtualbox.box --name=metasploitable3 .
4. Use vagrant plugin install vagrant-reload to install the reload vagrant provisioner if you haven't already.
5. To start the VM, run the command vagrant up . This will start up the VM and run all of the installation and configuration scripts necessary to set everything up. This takes about 10 minutes.

6. Once this process completes, you can open up the VM within VirtualBox and login. The default credentials are U: vagrant and P: vagrant.


Vulnerabilities

More Information
The wiki has a lot more detail and serves as the main source of documentation. Please check it out .

Acknowledgements
The Windows portion of this project was based off of GitHub user joefitzgerald's packer-windows project. The Packer templates, original Vagrantfile, and installation answer files were used as the base template and built upon for the needs of this project.


Share:

Monday, December 12, 2016

Security Auditing Tool for Unix/Linux Systems - Lynis 2.4.0


We are excited to announce this major release of auditing tool Lynis. Several big changes have been made to core functions of Lynis. These changes are the next of simplification improvements we made. There is a risk of breaking your existing configuration.

Lynis is an open source security auditing tool. Used by system administrators, security professionals, and auditors, to evaluate the security defenses of their Linux and UNIX-based systems. It runs on the host itself, so it performs more extensive security scans than vulnerability scanners.

Supported operating systems

The tool has almost no dependencies, therefore it runs on almost all Unix based systems and versions, including:
  • AIX
  • FreeBSD
  • HP-UX
  • Linux
  • Mac OS
  • NetBSD
  • OpenBSD
  • Solaris
  • and others
It even runs on systems like the Raspberry Pi and several storage devices!

Installation optional

Lynis is light-weight and easy to use. Installation is optional: just copy it to a system, and use "./lynis audit system" to start the security scan. It is written in shell script and released as open source software (GPL). 

How it works

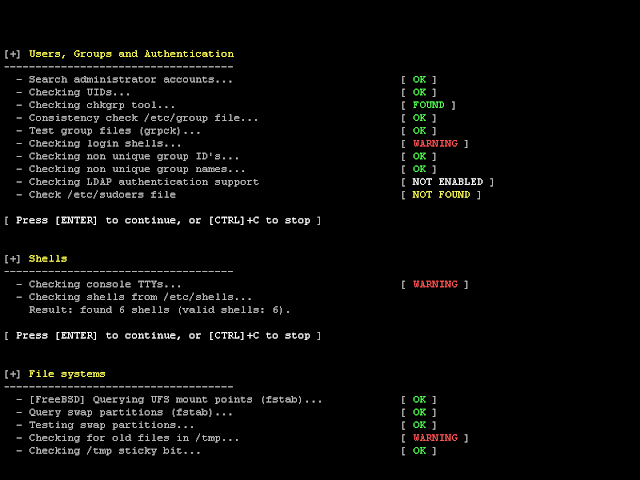
Lynis performs hundreds of individual tests, to determine the security state of the system. The security scan itself consists of performing a set of steps, from initialization the program, up to the report.

Steps
  1. Determine operating system
  2. Search for available tools and utilities
  3. Check for Lynis update
  4. Run tests from enabled plugins
  5. Run security tests per category
  6. Report status of security scan
Besides the data displayed on screen, all technical details about the scan are stored in a log file. Any findings (warnings, suggestions, data collection) are stored in a report file.

Opportunistic scanning

Lynis scanning is opportunistic: it uses what it can find.
For example if it sees you are running Apache, it will perform an initial round of Apache related tests. When during the Apache scan it also discovers a SSL/TLS configuration, it will perform additional auditing steps on that. While doing that, it then will collect discovered certificates, so they can be scanned later as well.

In-depth security scans

By performing opportunistic scanning, the tool can run with almost no dependencies. The more it finds, the deeper the audit will be. In other words, Lynis will always perform scans which are customized to your system. No audit will be the same!

Use cases

Since Lynis is flexible, it is used for several different purposes. Typical use cases for Lynis include:
  • Security auditing
  • Compliance testing (e.g. PCI, HIPAA, SOx)
  • Vulnerability detection and scanning
  • System hardening

Resources used for testing

Many other tools use the same data files for performing tests. Since Lynis is not limited to a few common Linux distributions, it uses tests from standards and many custom ones not found in any other tool.
  • Best practices
  • CIS
  • NIST
  • NSA
  • OpenSCAP data
  • Vendor guides and recommendations (e.g. Debian Gentoo, Red Hat)

Lynis Plugins

lugins enable the tool to perform additional tests. They can be seen as an extension (or add-on) to Lynis, enhancing its functionality. One example is the compliance checking plugin, which performs specific tests only applicable to some standard.


Changelog
Upgrade note
Lynis 2.4.0 (2016-10-27)

Exactly one month after previous release, the Lynis project is proud to announce
a new release. This release had the specific focus to improve support for macOS
users. Thanks to testers and contributors to make this possible.

New:
----
* New group "system integrity" added
* Support for clamconf utility
* Chinese translation (language=cn)
* New command "upload-only" to upload just the data instead of a full audit
* Enhanced support for macOS, including HostID2 generation for macOS
* Support for CoreOS
* Detection for pkg binary (FreeBSD)
* New command: lynis show hostids (show host ID)
* New command: lynis show environment (hardware, VM, or container type)
* New command: lynis show os (show operating system details)

Changes:
--------
* Several new sysctl values have been added to the default profile
* Existing tests have been enhanced to support macOS

Tests:
------
* AUTH-9234 - Support for macOS user gathering
* BOOT-5139 - Support for machine roles in LILO test
* BOOT-5202 - Improve uptime detection for macOS and others
* FIRE-4518 - Improve pf detection and mark as root-only test
* FIRE-4530 - Don't show error on screen for missing IPFW sysctl key
* FIRE-4534 - Check Little Snitch on macOS
* INSE-8050 - Test for insecure services on macOS
* MACF-6208 - Allow non-privileged execution and filter permission issues
* MALW-3280 - Detection for Avast and Bitdefender daemon on macOS
* NETW-3004 - Support for macOS
* PKGS-7381 - Improve test for pkg audit on FreeBSD
* TIME-3104 - Chrony support extended

Plugins (community and commercial):
-----------------------------------
* PLGN-1430 - Gather installed software packages for macOS
* PLGN-4602 - Support for Clam definition check on macOS


Share:

Thursday, December 1, 2016

SSH Server Auditing - ssh-audit


ssh-audit is a tool for ssh server auditing.

Features
  • SSH1 and SSH2 protocol server support;
  • grab banner, recognize device or software and operating system, detect compression;
  • gather key-exchange, host-key, encryption and message authentication code algorithms;
  • output algorithm information (available since, removed/disabled, unsafe/weak/legacy, etc);
  • output algorithm recommendations (append or remove based on recognized software version);
  • output security information (related issues, assigned CVE list, etc);
  • analyze SSH version compatibility based on algorithm information;
  • historical information from OpenSSH, Dropbear SSH and libssh;
  • no dependencies, compatible with Python 2.6+, Python 3.x and PyPy;

Usage
usage: ssh-audit.py [-bnv] [-l <level>] <host[:port]>

-1, --ssh1 force ssh version 1 only
-2, --ssh2 force ssh version 2 only
-b, --batch batch output
-n, --no-colors disable colors
-v, --verbose verbose output
-l, --level=<level> minimum output level (info|warn|fail)

  • batch flag -b will output sections without header and without empty lines (implies verbose flag).
  • verbose flag -v will prefix each line with section type and algorithm name. 


ChangeLog

v1.6.0 (2016-10-14)
  • implement algorithm recommendations section (based on recognized software)
  • implement full libssh support (version history, algorithms, security, etc)
  • fix SSH-1.99 banner recognition and version comparison functionality
  • do not output empty algorithms (happens for misconfigured servers)
  • make consistent output for Python 3.x versions
  • add a lot more tests (conf, banner, software, SSH1/SSH2, output, etc)
  • use Travis CI to test for multiple Python versions (2.6-3.5, pypy, pypy3)

v1.5.0 (2016-09-20)
  • create security section for related security information
  • match and output assigned CVE list and security issues for Dropbear SSH
  • implement full SSH1 support with fingerprint information
  • automatically fallback to SSH1 on protocol mismatch
  • add new options to force SSH1 or SSH2 (both allowed by default)
  • parse banner information and convert it to specific sofware and OS version
  • do not use padding in batch mode
  • several fixes (Cisco sshd, rare hangs, error handling, etc)

v1.0.20160902
  • implement batch output option
  • implement minimum output level option
  • fix compatibility with Python 2.6

v1.0.20160812
  • implement SSH version compatibility feature
  • fix wrong mac algorithm warning
  • fix Dropbear SSH version typo
  • parse pre-banner header
  • better errors handling

v1.0.20160803
  • use OpenSSH 7.3 banner
  • add new key-exchange algorithms

v1.0.20160207
  • use OpenSSH 7.2 banner
  • additional warnings for OpenSSH 7.2
  • fix OpenSSH 7.0 failure messages
  • add rijndael-cbc failure message from OpenSSH 6.7

v1.0.20160105
  • multiple additional warnings
  • support for none algorithm
  • better compression handling
  • ensure reading enough data (fixes few Linux SSH)

v1.0.20151230
  • Dropbear SSH support

v1.0.20151223
  • initial version

Share:

Sunday, October 16, 2016

A bash script for anonymizing the public IP managing the connection to TOR and different VPNs providers - 4nonimizer


What is 4nonimizer?
It is a bash script for anonymizing the public IP used to browsing Internet, managing the connection to TOR network and to different VPNs providers (OpenVPN), whether free or paid. By default, it includes several pre-configured VPN connections to different peers (.ovpn files) and download the credentials. Also, it records each used IP that we use every 300 seconds in log files.
This script is enabled as a service in systemd systems and uses a default vpn (VPNBook) at system startup.

Installation
Download the repo using git, execute the command ./4nonimizer install in the directory, and follow the screen instructions, 4nonimizer will move to the directory /opt/ and installed as a service.
This script has full compatibility with Kali Linux, although it has been properly tested and should also work on other distributions like Debian, Ubuntu and Arch (Manjaro). However there could be some bugs, or unexpected performances (please comments if you find any!).

Options
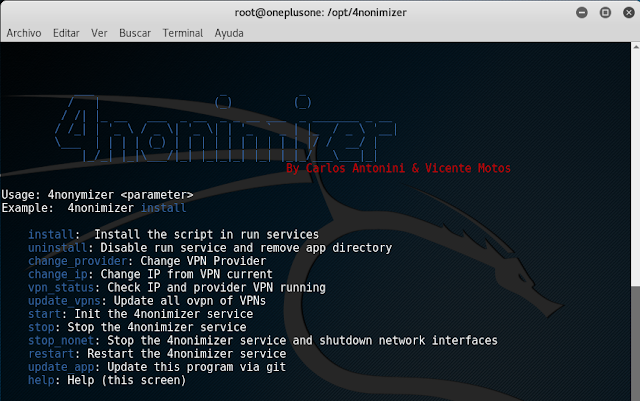
Once installed 4nonymizer, enter the command 4nonimizer help to get the help, which shows all the available parameters:

Available VPNs
Currently it supports the following VPN providers:
- HideMyAss https://www.hidemyass.com/
- TorGuard https://torguard.net/
- VPNBook (by default) http://www.vpnbook.com/
- VPNGate http://www.vpngate.net/en/
- VPNMe https://www.vpnme.me/
- VPNKeys https://www.vpnkeys.com/

Install a new VPN
To install an additional vpn we have to use the following structure in order to the 4nonimizer be able to integrate and perform operations with it.
First, we have to create the following dir structure /vpn/ within 4nonimizer path:


In our example we create the folder /vpntest/ and within it placed all .ovpn files we have. If the files ovpn not have the certificate within each of them we put in the same folder as shown in the example certificate.crt .
In addition, we must place a file named pass.txt containing 2 lines: the first one with the username and the second one with the password, as shown below:


If we have correctly performed all steps when we execute the command 4nonimizer change_provider the menu will show our vpn:


As you can see in the picture, option [7] it is the vpn we've created.

Getting credencials and ovpn files automatically
If the VPN provider allows automation of credential and/or .ovpn files getting, 4nonimizer has standardized the following scripts names and locations:
- /opt/4nonimizer/vpn/provider/ vpn-get-pass.sh


- /opt/4nonimizer/vpn/provider/ vpn-get-ovpn.sh


4nonimizer automatically detect the presence of both scripts and indicate (Auto-pass Login) or (Auto-get OVPN) if applicable.


Extras
- Execute 'source 4nonimizer' to activate autocompletation of parameters.
- Copy .conkyrc in your home directory to load a 4nonimizer template and execute conky.

References
- http://www.hackplayers.com/2016/08/tuto-enmascarar-ip-linux-vpn-tor.html
- http://www.hackplayers.com/2016/10/4nonimizer-un-script-para-anonimizar-ip.html

Versions
- 1.0-beta codename .bye-world! 5/10/2016


Share:

Sunday, October 9, 2016

Transparent Proxy through TOR, I2P, Privoxy, Polipo and modify DNS - anonym8


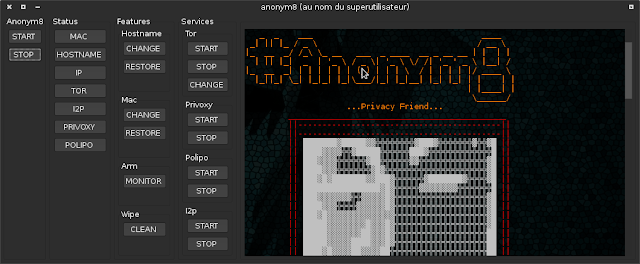
Transparent Proxy through TOR, I2P, Privoxy, Polipo and modify DNS, for a simple and better privacy and security; Include Anonymizing Relay Monitor (arm), macchanger, hostname and wipe (Cleans ram/cache & swap-space) features. Tested on Debian, Kali, Parrot to use the graphical interface, you'll need to install separately GTKdialog and libvte.so.9 and i2p

Script requirements are:
  • Tor        
  • macchanger 
  • resolvconf 
  • dnsmasq    
  • polipo     
  • privoxy           
  • arm        
  • libnotify  
  • curl
  • bleachbit

they'll be automatically installed.
Open a root terminal and type:
cd anonym8_directory I.Ex: cd /home/toto/Desktop/anonym8-master
chmod +x INSTALL.sh
bash INSTALL.sh

you're done!

For more security, use Firefox!
here's some useful Firefox add on:
profil manager => https://ftp.mozilla.org/pub/utilities/profilemanager/1.0/
random agent spoofer => https://addons.mozilla.org/en-US/firefox/addon/random-agent-spoofer/  
no script => https://addons.mozilla.org/en-US/firefox/addon/noscript/
ublock origin => https://addons.mozilla.org/en-US/firefox/addon/ublock-origin/
HTTPS everywhere => https://addons.mozilla.org/fr/firefox/addon/https-everywhere/  

Reboot your system and enjoy!

@HiroshimanRise
#anonym8 (Privacy Friend)

Share:

Tuesday, September 20, 2016

Build Your Own - PwnPhone

Build Your Own PwnPhone
We’ll attempt to show you how to build your own Pwn Phone running the Kali operating system and our AOPP (Android Open Pwn Project) image.
Let’s get cracking…

Flashing the Phone

  1. Download the Recovery image for your device:
    https://twrp.me/Devices
  2. Connect the device to the host machine via USB cable.
  3. Power off the device and boot into the Bootloader:
    Press and hold the Power & Volume-Down buttons
  4. Confirm the device is recognized by the host machine:
    (a device should be listed when the command returns)
    $ fastboot devices
  5. Unlock the device:$ fastboot oem unlock
  6. Once unlocked, flash the Recovery image:$ fastboot flash recovery <name-of-recovery-image>.img
  7. Once the Recovery image has been flashed, boot into Recovery from the Bootloader:
    Use the Volume-Down/Up buttons to cycle through the Bootloader options and then the Power button to select
  8. If prompted, swipe “Swipe to Allow Modifications”.
  9. Once in Recovery, wipe the device:
    Tap Wipe > Advanced Wipe > tap: Dalvik/ART cache, System, Cache, Data > swipe “Swipe to Wipe”
  10. Once wiped, do NOT boot into System (You don’t have one; you just wiped it). Tap the Home button to return to the Recovery home screen.
  11. Confirm again the device is recognized by the host machine:
    (a device should be listed when the command returns)$ adb devices
  12. From the host machine, push the downloaded AOPP ROM zip to the device sdcard:
    $ adb push <name-of-rom-zip>.zip /sdcard/
  13. On device, tap Install and then select the AOPP ROM zip from /sdcard.
  14. Swipe “Swipe to Confirm Flash”
  15. Once installed, tap “Reboot System”

OK Now Let’s Build the Phone

Downloading the Source

  1. Refer to “Downloading and Building Requirements” before proceeding:
    https://source.android.com/source/requirements.html
  2. Refer to “Downloading the Source” before proceeding:
    https://source.android.com/source/downloading.html
  3. Create a directory for the build system to live in and cd into that directory:$ mkdir <WORKING_DIR>$ cd <WORKING_DIR>
  4. Initialize a local repository using this source tree, use the command:
    $ repo init -u git@github.com:aopp/android_platform.git -b px-0.1
  5. Sync the repository, use:
    $ repo sync

Building

Devices are referred to by codename (e.g. hammerhead). Make sure to use this when substituting <device-codename> in the following instruction set.
  1. Refer to “Building the System” before proceeding:
    https://source.android.com/source/building.html
  2. To initialize the build environment, use the following command:$ . build/envsetup.sh
  3. Prepare the build environment (download device-tree and dependencies) for your specific device:$ breakfast <device-codename>
  4. Connect the device running a working AOPP/AOSP ROM to the host machine via USB.
  5. Make sure it is booted into system and confirm the device is recognized by the host machine:
    (a device should be listed when the command returns)$ adb devices
  6. Enter the device directory:$ cd <WORKING_DIR>/device/<vendor>/<device-codename>/
  7. Extract the proprietary binaries from your device:$ ./extract-files.sh
  8. Return to the root of the build system:$ croot
  9. Start a build run for your device:
    $ brunch <device-name>
  10. Once complete, the ROM zip can be found in the out/ directory:$ cd /out/target/product/<device-codename>
  11. The flashable ROM zip (product of the build run) will be located in the out/ directory as:
    aopp-0.1-<build-date>-UNOFFICIAL-<device-codename>.zip

Flashing

  1. Download and install the command line tools for your OS: https://developer.android.com/studio/index.html#downloads
  2. Download the AOPP ROM for your device:
    https://wiki.pwnieexpress.com/index.php/Official_devices
  3. Download the Recovery image for your device:
    https://twrp.me/Devices
  4. Connect the device to the host machine via USB cable.
  5. Power off the device and boot into the Bootloader:
    Press and hold the Power & Volume-Down buttons
  6. Confirm the device is recognized by the host machine:
    (a device should be listed when the command returns)
    $ fastboot devices
  7. Unlock the device:
    $ fastboot oem unlock
  8. Once unlocked, flash the Recovery image:$ fastboot flash recovery <name-of-recovery-image>.img
  9. Once the Recovery image has been flashed, boot into Recovery from the Bootloader:
    Use the Volume-Down/Up buttons to cycle through the Bootloader options and then the Power button to select
  10. If prompted, swipe “Swipe to Allow Modifications”.
  11. Once in Recovery, wipe the device:
    Tap Wipe > Advanced Wipe > tap: Dalvik/ART cache, System, Cache, Data > swipe “Swipe to Wipe”
  12. Once wiped, do NOT boot into System (You don’t have one; you just wiped it). Tap the Home button to return to the Recovery home screen.
  13. Confirm again the device is recognized by the host machine:
    (a device should be listed when the command returns)$ adb devices
  14. From the host machine, push the downloaded AOPP ROM zip to the device sdcard:$ adb push <name-of-rom-zip>.zip /sdcard/
  15. On device, tap Install and then select the AOPP ROM zip from /sdcard.
  16. Swipe “Swipe to Confirm Flash”
  17. Download SuperSU from Chainfire here:
    https://download.chainfire.eu/969/SuperSU/UPDATE-SuperSU-v2.76-20160630161323.zip
  18. Push the SuperSU zip to /sdcard/:
    $ adb push <SuperSU-zip-name>.zip /sdcard/
  19. Once installed, tap “Reboot System”
  20. Hack the Gibson…and remember…hugs are worth more than handshakes

Source: pwnieexpress


Share:

Monday, September 19, 2016

Secure Anonymous File Sharing - OnionShare


OnionShare lets you securely and anonymously share files of any size. It works by starting a web server, making it accessible as a Tor onion service, and generating an unguessable URL to access and download the files. It doesn’t require setting up a server on the internet somewhere or using a third party filesharing service. You host the file on your own computer and use a Tor onion service to make it temporarily accessible over the internet. The other user just needs to use Tor Browser to download the file from you.

Features:
  • A user-friendly drag-and-drop graphical user interface that works in Windows, Mac OS X, and Linux
  • Ability to share multiple files and folders at once
  • Support for multiple people downloading files at once
  • Automatically copies the unguessable URL to your clipboard
  • Shows you the progress of file transfers
  • When file is done transferring, automatically closes OnionShare to reduce the attack surface
  • Localized into several languages, and supports international unicode filenames

When users want to send files, the program creates a password-protected, temporary website hosted on the Tor network—what’s known as a Tor Hidden Service—that runs on their computer. They provide the recipient with the URL and password for that site, preferably via a message encrypted with a tool like PGP or Off-The-Record encrypted instant messaging. The recipient visits that URL in a Tor Browser and downloads the file from that temporary, untraceable website, without needing to have a copy of Onionshare.

As soon as the person has downloaded the file, you can just cancel the web server and the file is no longer accessible to anyone.

"It’s basically 100 percent darknet."


How to Use

Before you can share files, you need to open Tor Browser in the background. This will provide the Tor service that OnionShare uses to start the onion service.

Open OnionShare and drag and drop files and folders you wish to share, and click Start Sharing. It will show you a .onion URL such as http://asxmi4q6i7pajg2b.onion/egg-cain and copy it to your clipboard. This is the secret URL that can be used to download the file you’re sharing. If you’d like multiple people to be able to download this file, uncheck the “close automatically” checkbox.

Send this URL to the person you’re trying to send the files to. If the files you’re sending aren’t secret, you can use normal means of sending the URL: emailing it, posting it to Facebook or Twitter, etc. If you’re trying to send secret files then it’s important to send this URL securely.

The person who is receiving the files doesn’t need OnionShare. All they need is to open the URL you send them in Tor Browser to be able to download the file.

Using the command line version

In Linux: Just run  onionshare from the terminal.
In Windows: Add C:\Program Files (x86)\OnionShare to your PATH. Now you can run onionshare.exe in a command prompt.
In Mac OS X: Run ln -s /Applications/OnionShare.app/Contents/MacOS/onionshare /usr/local/bin. Now you can run onionshare from the terminal.


Onionshare can be particularly useful when someone sending a file wants to remain anonymous even to the recipient. If whistleblowers can securely send an Onionshare URL and password to a journalist, they potentially could use it to leak secrets anonymously without being exposed. That flips the model of how Tor enables leaks: Sites like WikiLeaks and news organizations using the anonymous leak software SecureDrop host their own Tor Hidden Services. Onionshare could put more power in whistleblowers’ hands, helping them send secrets to journalists who don’t have that sort of anonymous submission system in place.

What it protects against

  • Third parties don’t have access to files being shared. The files are hosted directly on the sender’s computer and don’t get uploaded to any server. Instead, the sender’s computer becomes the server. Traditional ways of sending files, like in an email or using a cloud hosting service, require trusting the service with access to the files being shared.
  • Network eavesdroppers can’t spy on files in transit. Because connections between Tor onion services and Tor Browser are end-to-end encrypted, no network attackers can eavesdrop on the shared files while the recipient is downloading them. If the eavesdropper is positioned on the sender’s end, the recipient’s end, or is a malicious Tor node, they will only see Tor traffic. If the eavesdropper is a malicious rendezvous node used to connect the recipient’s Tor client with the sender’s onion service, the traffic will be encrypted using the onion service key.
  • Anonymity of sender and recipient are protected by Tor. OnionShare and Tor Browser protect the anonymity of the users. As long as the sender anonymously communicates the OnionShare URL with the recipient, the recipient and eavesdroppers can’t learn the identity of the sender.
  • If an attacker enumerates the onion service, the shared files remain safe. There have been attacks against the Tor network that can enumerate onion services. If someone discovers the .onion address of an OnionShare onion service, they still cannot download the shared files without knowing the slug. The slug is generated by choosing two random words from a list of 6800 words, meaning there are 6800^2, or about 46 million possible slugs. But they can only make 20 wrong guesses before OnionShare stops the server, preventing brute force attacks against the slug. The OnionShare server also checks request URIs using a constant time string comparison function, so timing attacks can’t be used to help guess the slug.

What it doesn’t protect against

  • Communicating the OnionShare URL might not be secure. The sender is responsible for securely communicating the OnionShare URL with the recipient. If they send it insecurely (such as through an email message, and their email is being monitored by an attacker), the eavesdropper will learn that they’re sending files with OnionShare. If the attacker loads the URL in Tor Browser before the legitimate recipient gets to it, they can download the files being shared. If this risk fits the sender’s threat model, they must find a more secure way to communicate the URL, such as in an encrypted email, chat, or voice call. This isn’t necessary in cases where the files being shared aren’t secret.
  • Communicating the OnionShare URL might not be anonymous. While OnionShare and Tor Browser allow for anonymously sending files, if the sender wishes to remain anonymous they must take extra steps to ensure this while communicating the OnionShare URL. For example, they might need to use Tor to create a new anonymous email or chat account, and only access it over Tor, to use for sharing the URL. This isn’t necessary in cases where there’s no need to protect anonymity, such as coworkers who know each other sharing work documents.

Building OnionShare

Start by getting a copy of the source code:
git clone https://github.com/micahflee/onionshare.git
cd onionshare
For .deb-based distros (like Debian, Ubuntu, Linux Mint):
Then install the needed dependencies:
sudo apt-get install -y python3-flask python3-stem python3-pyqt5 python-nautilus
After that you can try both the CLI and the GUI version of OnionShare:
./install/scripts/onionshare
./install/scripts/onionshare-gui
A script to build a .deb package and install OnionShare easily is also provided for your convenience:
sudo apt-get install -y build-essential fakeroot python3-all python3-stdeb dh-python python-nautilus
./install/build_deb.sh
sudo dpkg -i deb_dist/onionshare_*.deb
Note that OnionShare uses stdeb to generate Debian packages, and python3-stdeb is not available in Ubuntu 14.04 (Trusty). Because of this, you can’t use the build_install.sh script to build the .deb file in versions of Ubuntu 14.04 and earlier. However, .deb files you build in later versions of Ubuntu will install and work fine in 14.04.
For .rpm-based distros (Red Hat, Fedora, CentOS):
sudo sudo dnf install -y rpm-build python3-flask python3-stem python3-qt5 nautilus-python
./install/build_rpm.sh
sudo yum install -y dist/onionshare-*.rpm
Depending on your distribution, you may need to use yum instead of dnf.
For ArchLinux:
There is a PKBUILD available here that can be used to install OnionShare.


Share:
Copyright © Offensive Sec Blog | Powered by OffensiveSec
Design by OffSec | Theme by Nasa Records | Distributed By Pirate Edition