Security of Information, Threat Intelligence, Hacking, Offensive Security, Pentest, Open Source, Hackers Tools, Leaks, Pr1v8, Premium Courses Free, etc

  • Penetration Testing Distribution - BackBox

    BackBox is a penetration test and security assessment oriented Ubuntu-based Linux distribution providing a network and informatic systems analysis toolkit. It includes a complete set of tools required for ethical hacking and security testing...
  • Pentest Distro Linux - Weakerth4n

    Weakerth4n is a penetration testing distribution which is built from Debian Squeeze.For the desktop environment it uses Fluxbox...
  • The Amnesic Incognito Live System - Tails

    Tails is a live system that aims to preserve your privacy and anonymity. It helps you to use the Internet anonymously and circumvent censorship...
  • Penetration Testing Distribution - BlackArch

    BlackArch is a penetration testing distribution based on Arch Linux that provides a large amount of cyber security tools. It is an open-source distro created specially for penetration testers and security researchers...
  • The Best Penetration Testing Distribution - Kali Linux

    Kali Linux is a Debian-based distribution for digital forensics and penetration testing, developed and maintained by Offensive Security. Mati Aharoni and Devon Kearns rewrote BackTrack...
  • Friendly OS designed for Pentesting - ParrotOS

    Parrot Security OS is a cloud friendly operating system designed for Pentesting, Computer Forensic, Reverse engineering, Hacking, Cloud pentesting...
Showing posts with label Web Applications. Show all posts

Thursday, July 27, 2017

A PHP Based Tool That Helps You To Manage All Your Backdoored Websites Efficiently - ShellStack


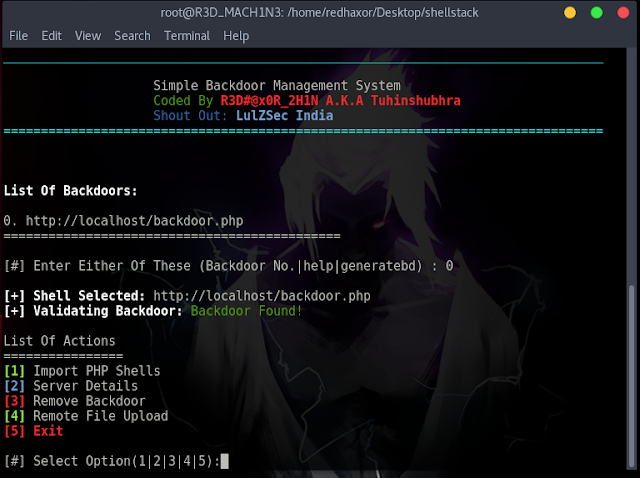
ShellStack is a PHP based backdoor management tool. This Tool comes handy for "HACKERS" who wish to keep a track of every website they hack. The tool generates a backdoor file which you just have to upload to the site and put the backdoor URL in the shells.txt present in the tool's directory.

With ShellStack You can
  • Import PHP Shells
  • Get Server Details
  • Upload Files From Your System using your terminal
  • And Above all You Can Manage Your Backdoors Efficiently

How To Use
  1. git clone https://github.com/Tuhinshubhra/shellstack
  2. cd shellstack
  3. php shellstack.php
  4. generatebd and exit the tool use CTRL + C - This will generate a backdoor file in the same directory as of the tool in a file named backdoor.php
  5. Upload The Backdoor File To The Victim website
  6. Copy The Backdoor URL and paste it in the shells.txt file present in the tool's directory and save it (Each backdoor is separated by a new line)
  7. php shellstack.php
  8. Enter The Serial No Assigned To The Backdoor
  9. Rest is pretty Self explanatory
Watch The Video Here: https://youtu.be/umk3ZNZ5Y1I

Requirements
php
curl 

Example
root@R3D_MACH1N3:/home/redhaxor/Desktop/shellstack# php shellstack.php


________________________________________________________________________________
_______ _     _ _______               _______ _______ _______ _______ _     _
|______ |_____| |______ |      |      |______    |    |_____| |       |____/
______| |     | |______ |_____ |_____ ______|    |    |     | |_____  |    \_
________________________________________________________________________________

                    Simple Backdoor Management System
                    Coded By R3D#@x0R_2H1N A.K.A Tuhinshubhra 
                    Shout Out: LulZSec India  
================================================================================


List Of Backdoors:

0. http://localhost/backdoor.php
=============================================

[#] Enter Either Of These (Backdoor No.|help|generatebd) : 0

[+] Shell Selected: http://localhost/backdoor.php
[+] Validating Backdoor: Backdoor Found!

List Of Actions
================
[1] Import PHP Shells
[2] Server Details
[3] Remove Backdoor
[4] Remote File Upload
[5] Exit

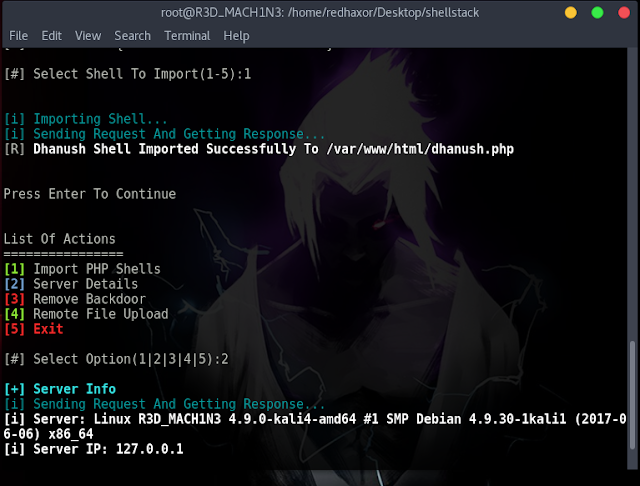
[#] Select Option(1|2|3|4|5):2

[+] Server Info
[i] Sending Request And Getting Response...
[i] Server: Linux R3D_MACH1N3 4.9.0-kali4-amd64 #1 SMP Debian 4.9.30-1kali1 (2017-06-06) x86_64
[i] Server IP: 127.0.0.1


Press Enter To Continue


List Of Actions
================
[1] Import PHP Shells
[2] Server Details
[3] Remove Backdoor
[4] Remote File Upload
[5] Exit

[#] Select Option(1|2|3|4|5):1


List Of Shells
===============
[1] Dhanush shell {User & Pass : shellstack123}
[2] B374K shell {Pass : shellstack123}
[3] Kurama shell V.1.0 {Pass : red}
[4] WSO shell {Pass : shellstack123}
[5] MiNi shell {User & Pass : shellstack123}

[#] Select Shell To Import(1-5):1


[i] Importing Shell...
[i] Sending Request And Getting Response...
[R] Dhanush Shell Imported Successfully To /var/www/html/dhanush.php


Press Enter To Continue


List Of Actions
================
[1] Import PHP Shells
[2] Server Details
[3] Remove Backdoor
[4] Remote File Upload
[5] Exit

[#] Select Option(1|2|3|4|5):5
root@R3D_MACH1N3:/home/redhaxor/Desktop/shellstack# 

Release(s)
Version 1.0 On 14-06-2017

Screenshot


Share:

Sunday, April 23, 2017

51 Tools for Security Analysts - Offensive Sec


Reading this list may be worrying or intimidating for readers who don’t work in the security industry. You should know that all tools on this list are free and publicly accessible. They are also well known within the professional security community and among malicious actors. This list of tools, software and utilities should empower anyone interested in protecting themselves and their online assets by making you aware of the capabilities that exist for analysts and malicious actors. By better understanding the tools that your adversary uses, you can better protect yourself.

Information gathering and analysis

Google dorks – Using advanced operators in the Google search engine to locate specific strings of text within search results.

Using Google for penetration or malicious activity may seem silly or obvious, but Google is incredibly powerful and very popular among analysts and malicious actors alike. “Google dorks”, or google-hacks as they’re also known, are a search query that attackers use on Google to identify targets. If you visit a site like exploit-db.com or any other database of exploits, you’ll find that many of them include Google dorks to help find targets to attack with the exploit.

Maltego – An interactive data mining tool that renders directed graphs for link analysis.
Maltego is one of our favorites. It is an investigator’s tool that lets you graphically organize your thoughts and your investigation by creating objects (people, places, devices, events) and link them. It also gives you the ability to run ‘transforms’ on objects. For example, you can run transforms on an IP address to list its malicious activity using external sources of threat intelligence. You can download a free version from Paterva which has some limitations.
You can see an example of the work we do with Maltego below.

FOCA – A tool used to find metadata and hidden information in the documents its scans.
When you create and publish MS Office, PDF, EPS and PS documents online, you may not realize how much information you are leaking to the general public. FOCA is a security analyst’s tool that can be used to extract ‘leaked’ data from documents that have been made public. Using FOCA, an analyst can find things like an organization’s network structure, IP addresses, internal server names, printers, shared folders, access control lists and more. You can watch this video filmed at DefCon 17 for a demo of how FOCA can be used by researchers or malicious actors to perform recon on a target organization or individual.

http://checkusernames.com/ – Check the use of a brand or username on 160 social networks.
If you simply want to find a unique username, checkusernames.com is a useful tool. If you are in the security field, it can be a powerful way to attribute an attack to a specific individual. Malware authors occasionally include usernames or ‘hacker names’ in their malware. Using this tool you can search 160 online services to see if they have used the same username somewhere else.

https://haveibeenpwned.com/ – Check if an account has been compromised in a data breach.
The term ‘pwned’ is slang for ‘owned’ which in the security industry means “to have your data or system compromised”. So ‘haveibeenpwned.com’ is slang for “Have I been owned dot com”. This is a well known and respected site run by Troy Hunt which finds and aggregates data from data breaches. You can use the service to find out if an account has been compromised by looking up your email or username.

https://www.beenverified.com/ – Search people & public records.
This is a general “people search” that is useful to find additional meta-data when researching a target during penetration testing or when researching an attacker.

Shodan – Search engine for Internet-connected devices.
This is a very popular service among security researchers. Shodan continually crawls and indexes devices on the internet. We recently used Shodan as part of our research into routers at several ISPs around the world that have been hacked and are now attacking WordPress. You can find a few example searches demonstrating Shodans use on their ‘explore’ page.

Censys – A search engine that allows computer scientists to ask questions about the devices and networks that compose the internet.
Censys is similar to Shodan in that it indexes devices and websites connected to the internet. The data is also searchable and differs from Shodan in some ways. Shodan is focused on ports and the services running on those ports. Censys is great at indexing web site SSL certificates among other things. Censys is maintained by a team of computer scientists at the University of Michigan and University of Illinois Urbana-Champaign.

Gephi – Visualization and exploration software for all kinds of graphs and networks.
We mentioned Maltego earlier in this post. It uses a ‘graph’ structure which is a diagram of linked objects to represent relationships. Gephi is a tool to analyze graph data at massive scale. We used Gephi to generate the graphical representations of attack data that we published in our February Attack report, seen below.


Fierce – A DNS reconnaissance tool for finding target IPs associated with a domain.
Fierce is a tool used to find IP addresses that are potential attack targets associated with a specific domain. It is used by penetration testers when evaluating insecure points on a network.

BuiltWith – Find out what websites are built with.
BuiltWith has a search engine-like interface and lets you search for a specific site to find out what tools were used to build it. BuiltWith also aggregates that data so that you can find out what the most popular technologies are on the web or how a specific technology is trending relative to another.

Wappalyzer – A cross-platform utility that uncovers the technologies used on websites.
Wappalyzer is another tool that helps you discover what technologies a specific site is using. Like BuiltWith, they also aggregate data to help you determine how technologies are trending. This is their view of the popularity of blog technologies, with WordPress clearly the market leader.


Wappalyzer Chrome extension
Wappalyzer also has a browser extension for Chrome that lets you immediately see the technologies a specific site is using. There is also a Python driver available on github called python-Wappalyzer.

https://aw-snap.info/ – Tools for owners of hacked websites to help find malware and recover their site.
aw-snap.info includes a suite of tools that may be helpful for site owners who have decided to try to clean their own hacked site. It can help you fetch pages as Google, which sometimes reveals malware. It can also decode base64 obfuscated malware and help find obfuscation in your files that may hide malware.

http://themecheck.org/ – A quick service that lets you verify WordPress themes for security and code quality.
ThemeCheck may help you verify your theme integrity by uploading it. It can also help find malware embedded in themes.

theHarvester – Gather emails, subdomains, hosts, employee names, open ports and banners from different public sources like search engines, PGP key servers and SHODAN.
This is a tool that performs a variety of reconnaissance operations on an organization and may be useful in the early stages of a penetration test to determine an organization’s overall online footprint.

Cymon.io – Tracker of malware, phishing, botnets, spam, and more.
Cymon can help you research a potentially malicious IP or malware hash. 

Mnemonic – A passive DNS database.
Mnemonic is a useful tool that can find which websites are hosted at a specific IP or which IPs host a website.

Vulnerability scanning and penetration testing

WPScan – A black box WordPress vulnerability scanner.
WPScan is a command line tool that is used to remotely scan WordPress sites for vulnerabilities.

Sqlmap – An open source penetration testing tool that automates the process of detecting and exploiting SQL injection flaws and taking over database servers.

SQLMap is widely used among penetration testers and is highly effective at finding and exploiting SQL injection vulnerabilities in target sites.

BeEF – A penetration testing tool that focuses on the web browser.
BeEF is a powerful tool that lets penetration testers exploit and control a web browser. Using BeEF you can set up a malicious website, exploit a visiting browser and gain access to the workstation running the browser. You can watch this 2014 KiwiCon video for a demo.

Firefox Hackbar – A simple security audit / penetration test tool.

Hackbar is a plugin for Firefox that may help application developers perform security audits on their own web applications. It includes a variety of tools to assist with this task.
Burp Suite – Software for web security testing.

Burp Suite is a very well known and powerful framework used to perform security audits and analysis on web applications. It includes a proxy that can intercept traffic and allow you to modify it on the fly. It includes a huge variety of exploit and penetration testing tools.

OpenVAS – An open source vulnerability scanner and manager.
You have probably heard of the vulnerability scanning tool Nessus. Back in 2005 Tenable Network Security changed the Nessus open source license to a closed source one. The developers forked the project at that time and created OpenVAS.
I’ve found that OpenVAS can be quite effective, but it is a bit more challenging to set up than Nessus. OpenVAS does have the advantage of being completely free and open source. The project is well known throughout the online security community.

Fiddler – A free web debugging proxy.
Fiddler is a proxy server that lets you intercept requests to a website, view them in different ways, modify the requests and can help debug websites and perform security audits.

Joomscan – Detect Joomla CMS vulnerabilities and analyze them.
Joomscan is the Joomla CMS’s equivalent of wpscan.

Kum0nga – A simple Joomla scan.
This is another joomla vulnerability scanner.

Arachni – A feature-full, modular, high-performance Ruby framework aimed towards helping penetration testers and administrators evaluate the security of modern web applications.
Arachni is a framework to perform detailed vulnerability scanning on web applications.

Forensics and log analysis

Lnav – An advanced log file viewer.
Lnav is short for log file navigator. It automatically detects your log file formats, provides syntax highlighting and a host of other features to view and analyze log files. It can be invaluable when analyzing a compromised website.

Mandiant Highlighter – A free log file analysis tool.
Mandiant (now owned by Fireeye) produced this useful product that can help analyze log files. It includes the ability to graphically view a histogram of log files and several other powerful log file analysis features.

Wp-file-analyser – Find modified, missing and extra files in a WordPress directory.
This utility can download the original versions of WordPress core and plugin files and can help you compare them against their originals.

Auditd – Access monitoring and accounting for Linux.
Access monitoring and logging/accounting is very helpful when monitoring a system to see if it is being attacked or performing an investigation after the attack. Auditd can help you improve logging and provide an audit trail on Linux.

Araxis Merge – Advanced 2 and 3-way file comparison (diff), merging and folder synchronization.
When responding to a hack, the ability to compare files to originals to determine what has changed is important. Araxis Merge is a powerful tool that can assist with this.

WinMerge – An Open Source differencing and merging tool for Windows.
Much like Araxis Merge, WinMerge can help you compare files to examine changes when responding to an incident.

DiffNow – Compare files online.
DiffNow is a web based file ‘diff’ tool that can also assist when comparing file differences during incident response.

Code and malware analysis

CyberChef – the Cyber Swiss Army Knife
CyberChef is a tool that is developed by GCHQ, the British intelligence agency. It can help de-obfuscate malware and other code.

UnPHP – A free service for analyzing obfuscated and malicious PHP code.
Obfuscating (hiding/garbling) PHP is a favorite tool of hackers, UnPHP can help analyze obfuscated code.

UnPacker – JavaScript unpacker.

Jsunpack – A generic JavaScript unpacker.
‘Packing’ javascript is a favorite technique of hackers who are dropping malicious javascript on websites. It makes their code more compact and harder to read. Jsunpack can help de-obfuscate JS code to make it more readable so that you can understand how it operates.

JSBeautifier – An online JavaScript beautifier.
Much like Jsunpack, JSBeautifier helps improve the readability of packed javascript code.

https://www.base64decode.org/ – Base64 Decode and Encode
Base64 encoding is a way to encode anything into an encoded string of (what appears to be) random characters. Anyone who is repairing hacked sites or responding to incidents uses base64 decoding several times a day to expose malicious code that has been base64 encoded. This tool can help decode base64 encoding.

https://www.urldecoder.org/ – URL Decode and Encode
URL encoding is also a popular way for hackers to hide their code, through encoding it using this form of encoding. urldecoder.org can help you decode malicious code that has been hidden using urlencoding.

http://lombokcyber.com/en/detools/decode-sourcecop – Decode SourceCop v3.x
This is a tool that decodes a specific type of PHP encoding that may prove useful during a hacked site investigation.

Other tools

regex101 – Develop and test regular expressions.
Regex, or regular expressions, are pattern matching routines to find complex patterns in files and code. 

regexpal – Another site to develop and test regular expressions.
Both regex101 and regexpal provide online development environments to help you create or analyze regular expressions.

HashKiller – Online hash cracking service. Useful to reverse engineer hashes into passwords.
In most systems, passwords are stored as hashes. Malware authors occasionally use hashing to store their own passwords. In our research we have needed to crack hashes that are used by malware authors in order to read their source code. HashKiller can help reverse a hash into a password if you need to crack a hash as part of your malware analysis.

Noscript – Noscript is a Firefox extension that allows Javascript, Java and Flash to only be executed by websites that you define and trust.
When visiting malicious websites, Noscript can help disable malicious code on that site. Note that you should always visit a malicious site that you are analyzing using a virtual machine that has no important data on it. If the VM gets infected, you can simply destroy it without worrying about important data being leaked. Using Noscript in your browser within your virtual environment can be useful when analyzing the function of a hacked site.

Other lists of tools

  • Awesome Forensics – A curated list of awesome free (mostly open source) forensic analysis tools and resources.

  • awesome-incident-response – A curated list of tools and resources for security incident response, aimed to help security analysts and DFIR teams.

  • OSINT Framework – OSINT is short for ‘open source intelligence’. This site provides a graphical directory of OSINT resources.

Kali Linux

Kali Linux is a linux distribution that is the favorite of penetration testers and security analysts world-wide. It is a linux distribution that comes packed with security analysis tools. If you want to learn about cyber security, Kali should be one of your starting points. If you simply would like to know about some of the more important tools that Kali provides, you can use the list below.
Kali Linux Tools Listing – All the tools in Kali Linux, a Linux variant used by penetration testers and security analysts.

Conclusion

The tools on this page can help you respond to an incident, test the security of your own website and better understand how attackers think and what tools they have available to them. As always I welcome your feedback in the comments and you are most welcome to suggest your own favorite security or analysis tools.
Share:

Friday, April 21, 2017

Backdoor C&C for Populars Browsers - Chromebackdoor


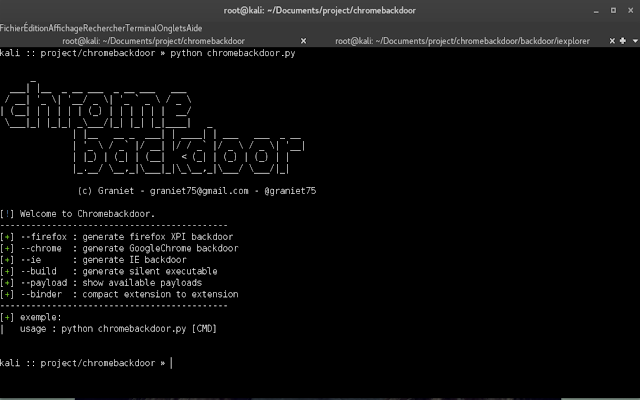
Chromebackdoor is a pentest tool, this tool use a MITB technique for generate a windows executable ".exe" after launch run a malicious extension or script on most popular browsers, and send all DOM datas on command and control.

VIDEO

Require:
  • pip install crxmake
  • wine32
Let's go
python chromebackdoor.py


web browser infection
  • pour rappel, infiltrer, surveiller, un système informatique sans autorisation est un délit
  • reminder, infiltrate, monitor, computer system without authorization is a crime

Share:

Sunday, January 8, 2017

Web Application Security Testing Tool - Acunetix v11


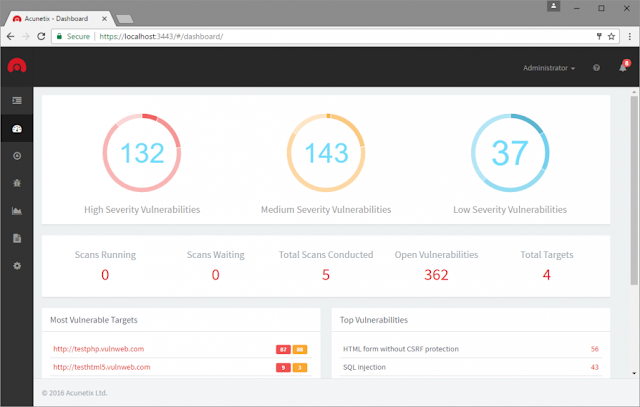
London, UK – November 2016 – Acunetix, the pioneer in automated web application security software, has announced the release of version 11. New integrated vulnerability management features extend the enterprise’s ability to comprehensively manage, prioritise and control vulnerability threats – ordered by business criticality. Version 11 includes a new web-based UI for greater ease-of-use and manageability, providing access by multiple users.
For the first time in the marketplace Acunetix is launching an enterprise-level product that integrates sophisticated automated testing technology with vulnerability management, at a price point accessible to every development team. Chris Martin, CEO, Acunetix explains:
“Acunetix has for the past 12 years been at the forefront in web application security with its cutting-edge vulnerability scanning technology. With version 11 we have combined proactive scanning for web application vulnerabilities with the prioritization of mitigation activities. This integration helps security teams gain the intelligence they need to work more efficiently, prioritizing actions, assigning jobs and therefore reducing costs.”
The new web-based interface significantly improves the manageability of the Acunetix on-premises solution, making it easy for less seasoned security personnel to check the vulnerabilities within the company’s web assets. In addition, user privileges can be automatically assigned.
Nicholas Sciberras, CTO, Acunetix, comments: “Version 11 helps organizations engaged heavily in application development by utilising a role-based multi-user system.”

Inbuilt Vulnerability Management

New integrated vulnerability management features allow for the review of aggregated vulnerability data across all Targets, prioritizing security risks and therefore providing a clear view of the business’ security posture, while facilitating compliance.
New inbuilt vulnerability management features include:
  • All Targets (web applications to scan) are now stored in Acunetix with their individual settings and can be easily re-scanned.
  • Targets are displayed in one interface and classified by business criticality, allowing you to easily focus on the most important assets.
  • Vulnerabilities can also be prioritized by the Target’s business criticality.
  • Consolidated reports are stored in the central interface.
  • Users can choose between “Target reports”, “Scan reports” or “All Vulnerabilities” report.

Web-based user interface

The user interface has been re-engineered from the ground up for greater usability and manageability. The minimalist design focuses on the most widely used and important features, doing away with extras which cluttered the screen. Since the interface is now web-based, multiple users can access it from their browser irrespective of the OS used.


Role-based multi-user system

Acunetix version 11 allows the creation of multiple user accounts, which can be assigned a particular group of targets. Depending on the privileges assigned to the user, the user can create, scan, and report on the targets assigned to him.This is particularly important for large enterprises, which require multiple users to help secure their assets.


Standard, Pro and Enterprise Editions

Acunetix version 11 will be available in three main editions: Standard, Pro and Enterprise.
Standard Edition is the entry level, ideal for small organisations and single workstation users. The Standard Edition offers the same level of vulnerability detection provided in the Pro and Enterprise Editions and includes Developer, Executive Summary and OWASP Top 10 reports.
Pro Edition The Pro Edition allows outsourced or insourced security professionals to group and classify asset targets. It integrates with Software Development Life Cycle (SDLC) project management or bug tracking systems, includes comprehensive compliance reports, and integrates with top Web Application Firewalls (WAFs).
Enterprise Edition includes full multi-user team support and has the ability to deploy multiple scan engines managed by the central system. The Enterprise Edition will be able to scale from 3 to unlimited users and up to 50 Acunetix scan engines.


Download Acunetix v11

Share:

Thursday, December 1, 2016

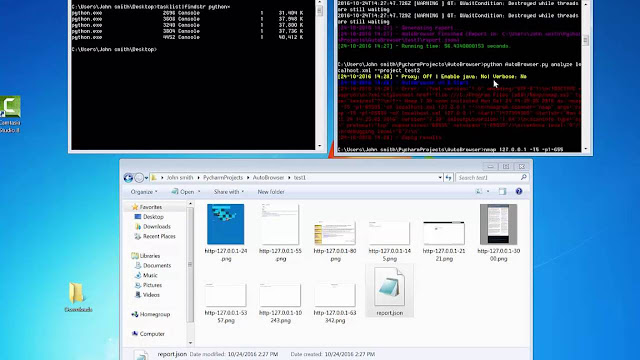
AutoBrowser Screenshot of HTTP/s Based Ports - AutoBrowser 4.0


AutoBrowser is a tool written in python for penetration testers. The purpose of this tool is to create report(Json file) and screenshots of http/s based ports on the network. you can choose between analyze Nmap report(XML file -oX ) or scan with Nmap, then the tool automaticly Check the results with http/s request on each host using headless web browser, then it would take a screenshot of the response page content.

  • This tool is designed for IT professionals to perform penetration testing.

Documentation:
positional arguments: * analyze - Analyze and browse (Require argument: nmap report location) ** scan - Scan and browse (Require argument: target host or file)
optional arguments: * -h, --help - show this help message and exit * **-p PROJECT, --project PROJECT * - project name (folder which contain all the data. default: project) * **-t TIMEOUT, --timeout TIMEOUT * - http request timeout period * **-w MAX_WORKERS, --max-workers MAX_WORKERS * - Max worker processes (Default: 4) * **--useragent USERAGENT * - Set specific user agent * **--java-enabled * - Display Java enviroment * **--verbose * - Show all checks verbosly * **--proxy PROXY * - Relay connections through HTTP/socks5 proxy (Example: socks5://127.0.0.1:8080) * **--proxy-auth PROXY_AUTH * - Set proxy credentials. (Example: username:password)

Examples:
You must to delimiting the values on the CLI arguments via double quotes only!
  • Get argument details of scan method:
    python AutoBrowser.py scan --help   
  • Scan with Nmap, checks the results and create folder by name project_name verbose via 10 workers:
    python AutoBrowser.py scan "192.168.1.1/24" -a="-sT -sV -T3" -p project_name --workers=10   
  • Scan a host list via Nmap(like -iL Nmap flag), checks the results and create folder by name project_name and enabling java environment:
    python AutoBrowser.py scan file_path.txt -a="-sT -sV -T3" -p project_name --verbose --java-enabled   
  • Get the argument details of analyze method:
    python AutoBrowser.py analyze --help   
  • Analyzing Nmap XML report and create folder by name report_analyze trough a Proxy:
    python AutoBrowser.py analyze nmap_file.xml --project report_analyze --proxy="socks5://127.0.0.1:8080"   
  • Analyzing Nmap XML report and create folder by name report_analyze trough a Proxy with credentials:
    python AutoBrowser.py analyze nmap_file.xml --project report_analyze --proxy="http://127.0.0.1:8080" --proxy-auth="username:password"   
  • Analyzing Nmap XML report and create folder by name report_analyze with specify user agent:
    python AutoBrowser.py analyze nmap_file.xml --project report_analyze --user-agent="My New UserAgent"   

Requirements:

Linux Installation:
  1. sudo apt-get install python-pip python2.7-dev libxext-dev python-qt4 qt4-dev-tools build-essential nmap
  2. sudo pip install -r requirements.txt

MacOSx Installation:
  1. Install Xcode Command Line Tools (AppStore)
  2.      ruby -e "$(curl -fsSL https://raw.github.com/mxcl/homebrew/go)"    
  3. brew install pyqt nmap
  4. sudo easy_install pip
  5. sudo pip install -r requirements.txt

Windows Installation:
  1. Install setuptools
  2. Install pip
  3. Install PyQt4
  4. install Nmap
  5. Open Command Prompt(cmd) as Administrator -> Goto python folder -> Scripts (cd c:\Python27\Scripts)
  6. pip install -r (Full Path To requirements.txt)


Share:

Friday, November 18, 2016

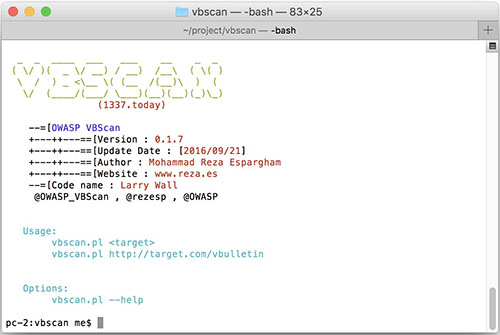
Black Box vBulletin Vulnerability Scanner - VBScan 0.1.7


OWASP VBScan (short for [VB]ulletin Vulnerability [Scan]ner) is an opensource project in perl programming language to detect VBulletin CMS vulnerabilities and analyses them .

Why OWASP VBScan ?
If you want to do a penetration test on a vBulletin Forum, OWASP VBScan is Your best shot ever! This Project is being faster than ever and updated with the latest VBulletin vulnerabilities.

usage :
./vbscan.pl <target>
./vbscan.pl http://target.com/vbulletin

OWASP VBScan 0.1.7 introduction (Youtube)


What’s New in Version 0.1.7 [Dennis Ritchie]
OWASP VBScan 0.1.7 [Larry Wall]
  • Updated exploit database
  • Compatible With Windows [Linux,OSX,Windows]
  • Added Full Path Disclosure (FPD) module
  • Added firewall detect/bypass module
  • Optimized version checker module engine [#12 issue]
  • Upgrade config finder module
  • Random user agent module set as default setting
  • Added HTML Report


Share:

Thursday, October 6, 2016

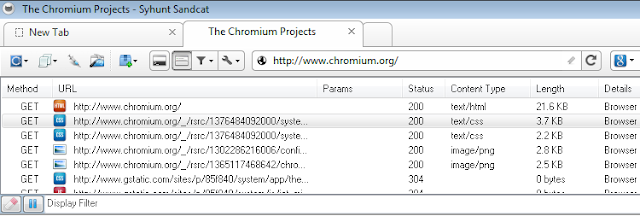
PenTest Oriented Web Browser - Sandcat Browser 5.3


Sandcat is a lightweight multi-tabbed web browser that combines the speed and power of Chromium and Lua. Sandcat comes with built-in live headers, an extensible user interface and command line console, resource viewer, and many other features that are useful for web developers and pen-testers and when you need to examine live web applications. For more details, visit http://www.syhunt.com/sandcat/ . See also the docs directory and credits section below for a few more details about the Sandcat architecture.

Directories
  • /docs - Lua API documentation
  • /packs - contents of uncompressed pack files
    • /Common - common CSS, widgets and scripts package (Common.pak)
    • /Resources - resources package (Resources.pak)
  • /src - the main executable source and built-in resource files
    • /core - user interface source
    • /html - user interface resources (HTML)
    • /lua - Lua API source

Download
Compiled binaries for Windows can be downloaded from the links below.

Compiling
For compiling Sandcat, you will just need Catarinka and pLua .
The entire Sandcat user interface is created during runtime, so there is no need to install third-party components in the IDE - you can just add the dependencies listed above to the library path and hit compile. It compiles under Delphi 10 Seattle down to XE2. If you are trying to compile it with Lazarus, let me know which errors you get - I will try to do the same soon.
Some work is still needed before a Mac or Linux version materializes.

ChangeLog

5.3

This upgrade brings more stability on newer OSes.
  • Fixed: constant freeze during navigation under some Windows installations (IPC related).
  • Fixed: AV when restoring minimized Sciter dialog.
  • Replaced the Selenite library with Catarinka.

5.2

  • Added the ability to create offscreen Chromium renderers using the Lua API.
  • Improved tab status bar text handling.
  • Improved task script error handling.
  • Improved live headers.
  • Improved startup for Windows 10 compatibility.
  • Make window close work as cancel in Preferences dialog.
  • The Chromium library was upgraded to the latest release.
  • Some extensive code cleanup.
  • Minor user experience improvements.
  • 64-bit version now available separately (special thanks for @RJ35 for fixing a Chromium
related crash under Win64 environments making this release possible)
  • Fixed: a rare crash when switching tabs.

5.1

This release address minor issues like a crash when loading a homepage during startup or calling the context-menu from a loaded web page.

5.1 Beta 3

This release uses the latest Chromium binaries. This fixes some instability issues when browsing with the live headers enabled.

5.1 Beta 2

This release is focused on stability and performance, as well as some other improvements such as being able to ignore certificate errors while navigating and open PDF files.
Here is what changed in version 5.1:
  • Switched to the WACEF Chromium framework and the latest Chromium binaries. This significantly improves speed and stability, and fixes some issues during shutdown.
  • Most preferences now get applied instantly (just need to open a new tab instead of restarting).
  • Added a certificate error dialog.
  • Added a PDF viewer plugin.
  • Added proxy support.
  • Improved Lua integration.
  • Minor compiler optimizations.
  • The OpenSSL library was upgraded to the latest release.
  • The Selenite library was upgraded to the latest release.

5.0

We're excited to announce a brand new version of our Sandcat Browser (codenamed Catarinka browser), now available as a free, open source project - because many people asked for it, the entire source for Sandcat is now available on GitHub. Feel free to fork it, examine it, contribute code, send suggestions, report or fix issues.
Here is what changed in version 5.0 beta 1:

  • Faster startup and responsiveness.
  • Huge refactoring and cleanup of the current code.
  • The Chromium library was upgraded to the latest release (incredibly fast!).
  • Improved compatibility with 64-bit Windows editions.
  • Improved source code editor.
  • Available as free, open source/community edition (under a BSD-3-Clause license).
  • Built using components and libraries from the Catarinka toolkit (also made open source at the same time with this release and under the same license).
  • Includes the Selenite Lua library - a multi-purpose set of Lua extensions developed to make the development of Lua extensions easier in Sandcat. The code for Selenite is now open source, under the MIT license. The library documentation is available here.
  • Fixed: output of the SHA1 and the full URL encoders that come with the pen-tester pack. 


Share:

Saturday, September 3, 2016

Web Application Firewall using DFA - Raptor WAF v0.2


Raptor WAF is a simple web application firewall made in C, using KISS principle, to make poll use select() function, is not better than epoll() or kqueue() from *BSD but is portable,  the core of match engine using DFA to detect XSS, SQLi and path traversal.

No more words, look at the following :


WAF stands for Web Application Firewall. It is widely used nowadays to detect and defend SQL Injections and XSS...
  • You can block XSS, SQL injection attacks and path traversal with Raptor
  • You can use blacklist of IPs to block some users at config/blacklist ip.txt
  • You can use IPv6 and IPv4 at communications
  • At the future DoS protector, request limit, rule interpreter and Malware detector at uploads.
  • At the future SSL/TLS...


to run:

$ git clone https://github.com/CoolerVoid/raptor_waf
$ cd raptor_waf; make; bin/raptor

Example

Up some HTTPd server at port 80
$ bin/Raptor -h localhost -p 80 -r 8883 -w 4 -o loglog.txt
you can test at http://localhost:8883/test.php

Look the docs

https://github.com/CoolerVoid/raptor_waf/blob/master/doc/raptor.pdf

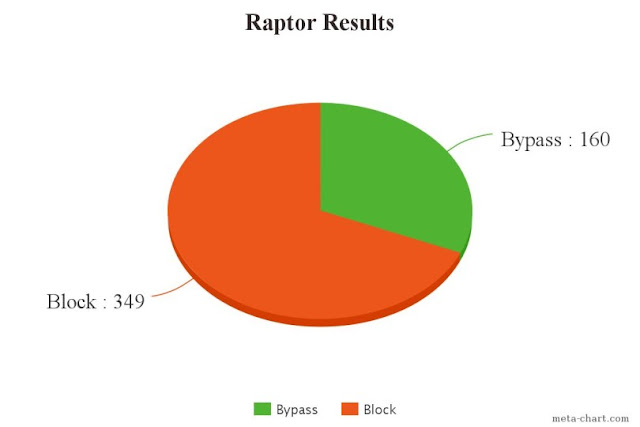
Tests:

509 of attacks, detect and block 349, 68% of attacks blocked


Steps to create your WAF(web application firewall) in C

Following definition (like OWASP), a WAF is a piece of software intended to protect a web app that is on the level of the application. nowadays, a WAF is not defined by the web app, it’s not a customized solution specific to that application but similarly to a general software firewall, where one that contains parameters to protect against intrusion in a wide variety of frameworks and codes. Trying clear your mind, there is overlap between the different types of firewalls. Software and hardware firewalls are used in their own right to protect networks. However, WAFs with their specialized function for web applications, can take the form input of either of those two main types. Per default, a firewall uses a blacklist, protecting against an individual, previously logged attacks. Additionally, it can also use a white list, providing allowable users and instances of interaction for the application, another function is block SQL Injection attacks and XSS attacks… Another context  WAFs can create random tokens and put in forms to try blocks web robots and automated attacks, this practice can try mitigate CSRF pitfalls. Before you ask “How i can do  it?”, i gotta bring to you some principles, anyway the theory around facts…


Have two common WAFs:

1- Uses plugin in HTTPd to get information of data INPUT or OUTPUT, before finish he gets the request and block some contents, this function focuses at HTTP METHODs POST, GET…  


 2- This way, is my favorite, is a independent reverse proxy server, he bring all requests of the client to the proxy, the proxy makes some analysis in the content, if not block, he send all the information to the external server… 

  
Number One is a cold, this path is not fully portable… other bad thing you need create a diferent plugin each HTTPd, something to apache another to NGINX, IIs, lighttpd…  its not cool! If you are not a good low level programmer… you can try use twisted of python, is easy make reverse proxy with it, but is not good way, because not have good performance in production… if you piss off for it, study the Stevens book of sockets. Its OK, the title of this post is “create waf in C”, Task fully done here and commented and with some documentations in LaTex… relax, you can get it in this repository:


Share:

Saturday, August 20, 2016

Web Spidering Framework - Malspider

Malspider is a web spidering framework that inspects websites for characteristics of compromise. Malspider has three purposes:
  • Website Integrity Monitoring: monitor your organization’s website (or your personal website) for potentially malicious changes.
  • Generate Threat Intelligence: keep an eye on previously compromised sites, currently compromised sites, or sites that may be targeted by various threat actors.
  • Validate Web Compromises: Is this website still compromised?

What can Malspider detect?

Malspider has built-in detection for characteristics of compromise like hidden iframes, reconnaisance frameworks, vbscript injection, email address disclosure, etc.
As we find stuff we will continue to add classifications to this tool and we hope you will do the same. Malspider will be a much better tool if CIRT teams and security practitioners around the world contribute to the project. ciscocsirt


Prerequisites

Please make sure these technologies are installed before continuing:
  • Python 2.7.6
  • Updated version of pip
  • mysql
Note: If your server already has specific versions of these components installed, you can use a virtualenv to create an isolated python environment.
Tested and working on minimal installations of:
  • Ubuntu 14
  • CentOS 6
  • CentOS 7

Installation

Start the installation process by running “./quick_install” from the command line. Please read the prompts carefully!!
Malspider comes with a quick_install script found in the root directory. This scripts attempts to makes the installation process as painless as possible by completing the following steps:
  1. Install Database: creates a database titled ‘malspider’, creates a new mysql user, and applies db schema.
  2. Install Dependencies: installs ALL dependencies and modules required by Malspider.
  3. Django Migrations: applies django migrations to the database (necessary for the web app).
  4. Create Web Admin User: creates an administrative user for the web application.
  5. Add Access Control: creates iptables rules to block port 6802 (used by the daemon) and open port 8080 (web app).
  6. Add Cronjobs: creates crontab entries to schedule jobs, analyze data, and purge the database after a period of time.
Note: The quick_install script uses scripts found under the install/ directory. If any of the above steps fail you can attempt to complete them manually using those scripts.

Start

Start Malspider by running “./quick_start” from the command line. Malspider comes with a quick_start script found in the root directory. This script attempts to start the daemon and the web application. Malspider can be accessed from your browser on port 8080 @ http://0.0.0.0:8080
Interaction with Malspider happens via an easy-to-use dashboard accessible through your web browser. The dashboard enables you to view alerts, inspect injected code, add websites to monitor, and tune false positives. You can add websites to you want to crawl by navigating to the administrative panel @ http://0.0.0.0:8080/admin (or by clicking on the admin link from the dashboard). Click on “Organizations” and a new Organization. You’ll be prompted for the:
  • website name (ie. “Cisco Systems”)
  • domain (ie. cisco.com)
  • industry/org category (ie. Energy, Political, Education, etc)
By default, Malspider crawls 20 pages per domain. This can be changed. You can crawl as many pages as you like (per domain) or you can crawl only the homepage of each site.

Malspider randomly selects a user agent string from a list found at malspider/resources/useragents.txt. If you would like to add more user agents to the list then simply edit that text file. Malspider has also built-in capabilities for taking screenshots of every page it crawls. Screenshots can be useful in a variety of situations, but this can cause a drastic increase in server space utilization. For that reason, screenshots are turned off by default. For this reason email address detection is also off by default. Malspider crawls websites and stores information about those sites in a database. The data in the database is post-processed and analyzed for potentially malicious characteristics. You can view results from the analyzer by simply viewing the dashboard and clicking on “View Alerts”. Your database can grow rather large very quickly. It is recommended that, for performance reasons, you delete data from the ‘pages’ table and the ‘elements’ table once per month


Share:
Copyright © Offensive Sec Blog | Powered by OffensiveSec
Design by OffSec | Theme by Nasa Records | Distributed By Pirate Edition