Security of Information, Threat Intelligence, Hacking, Offensive Security, Pentest, Open Source, Hackers Tools, Leaks, Pr1v8, Premium Courses Free, etc

  • Penetration Testing Distribution - BackBox

    BackBox is a penetration test and security assessment oriented Ubuntu-based Linux distribution providing a network and informatic systems analysis toolkit. It includes a complete set of tools required for ethical hacking and security testing...
  • Pentest Distro Linux - Weakerth4n

    Weakerth4n is a penetration testing distribution which is built from Debian Squeeze.For the desktop environment it uses Fluxbox...
  • The Amnesic Incognito Live System - Tails

    Tails is a live system that aims to preserve your privacy and anonymity. It helps you to use the Internet anonymously and circumvent censorship...
  • Penetration Testing Distribution - BlackArch

    BlackArch is a penetration testing distribution based on Arch Linux that provides a large amount of cyber security tools. It is an open-source distro created specially for penetration testers and security researchers...
  • The Best Penetration Testing Distribution - Kali Linux

    Kali Linux is a Debian-based distribution for digital forensics and penetration testing, developed and maintained by Offensive Security. Mati Aharoni and Devon Kearns rewrote BackTrack...
  • Friendly OS designed for Pentesting - ParrotOS

    Parrot Security OS is a cloud friendly operating system designed for Pentesting, Computer Forensic, Reverse engineering, Hacking, Cloud pentesting...

Monday, December 4, 2017

All-in-One Wi-Fi Cracking Tools for Android - Hijacker v1.4


Hijacker is a Graphical User Interface for the penetration testing tools Aircrack-ng, Airodump-ng, MDK3 and Reaver. It offers a simple and easy UI to use these tools without typing commands in a console and copy&pasting MAC addresses.
This application requires an ARM android device with a wireless adapter that supports Monitor Mode. A few android devices do, but none of them natively. This means that you will need a custom firmware. Nexus 5 and any other device that uses the BCM4339 chipset (MSM8974, such as Xperia Z2, LG G2 etc) will work with Nexmon (it also supports some other chipsets). Devices that use BCM4330 can use bcmon. An alternative would be to use an external adapter that supports monitor mode in Android with an OTG cable.
The required tools are included for armv7l and aarch64 devices as of version 1.1. The Nexmon driver and management utility for BCM4339 are also included.
Root is also necessary, as these tools need root to work.


Features

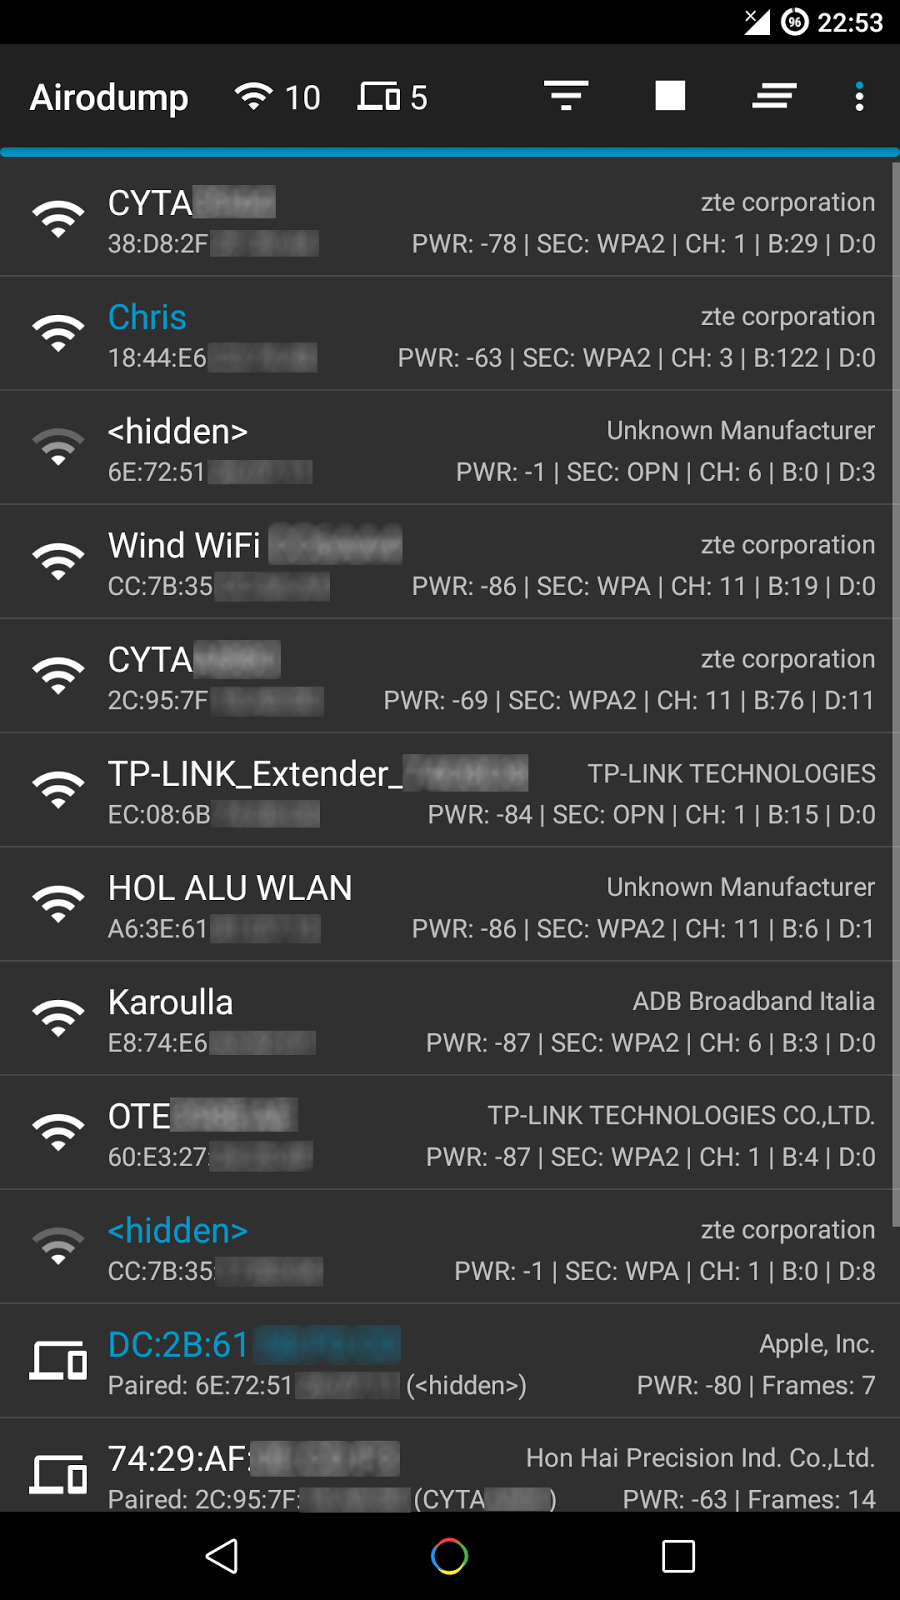
Information Gathering
  • View a list of access points and stations (clients) around you (even hidden ones)
  • View the activity of a specific network (by measuring beacons and data packets) and its clients
  • Statistics about access points and stations
  • See the manufacturer of a device (AP or station) from the OUI database
  • See the signal power of devices and filter the ones that are closer to you
  • Save captured packets in .cap file

Attacks
  • Deauthenticate all the clients of a network (either targeting each one (effective) or without specific target)
  • Deauthenticate a specific client from the network it's connected
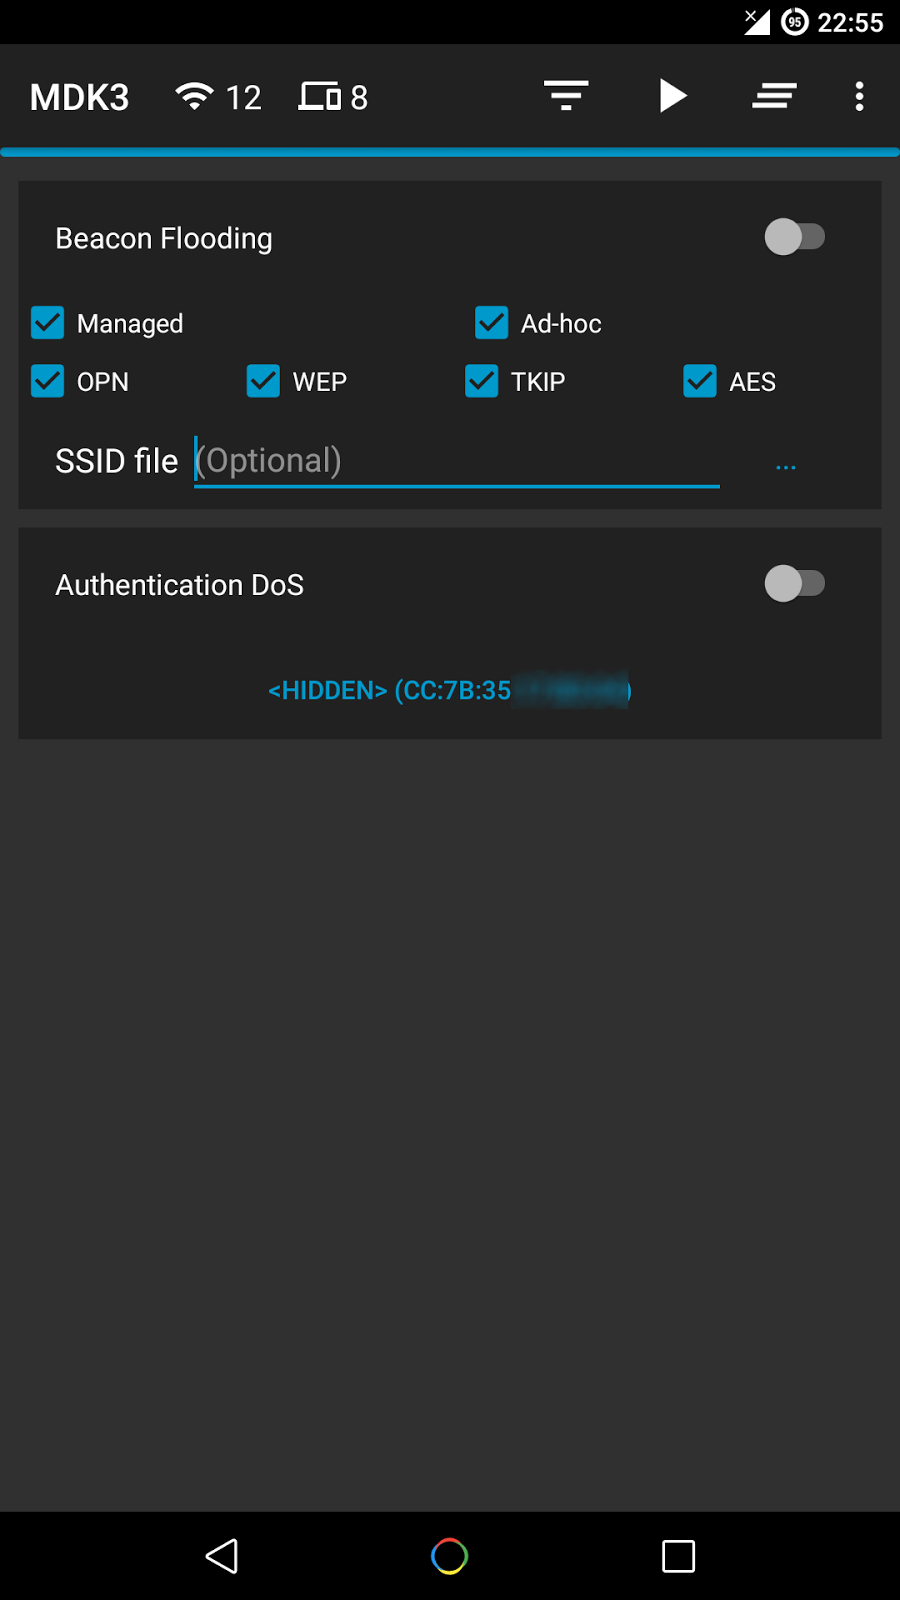
  • MDK3 Beacon Flooding with custom options and SSID list
  • MDK3 Authentication DoS for a specific network or to everyone
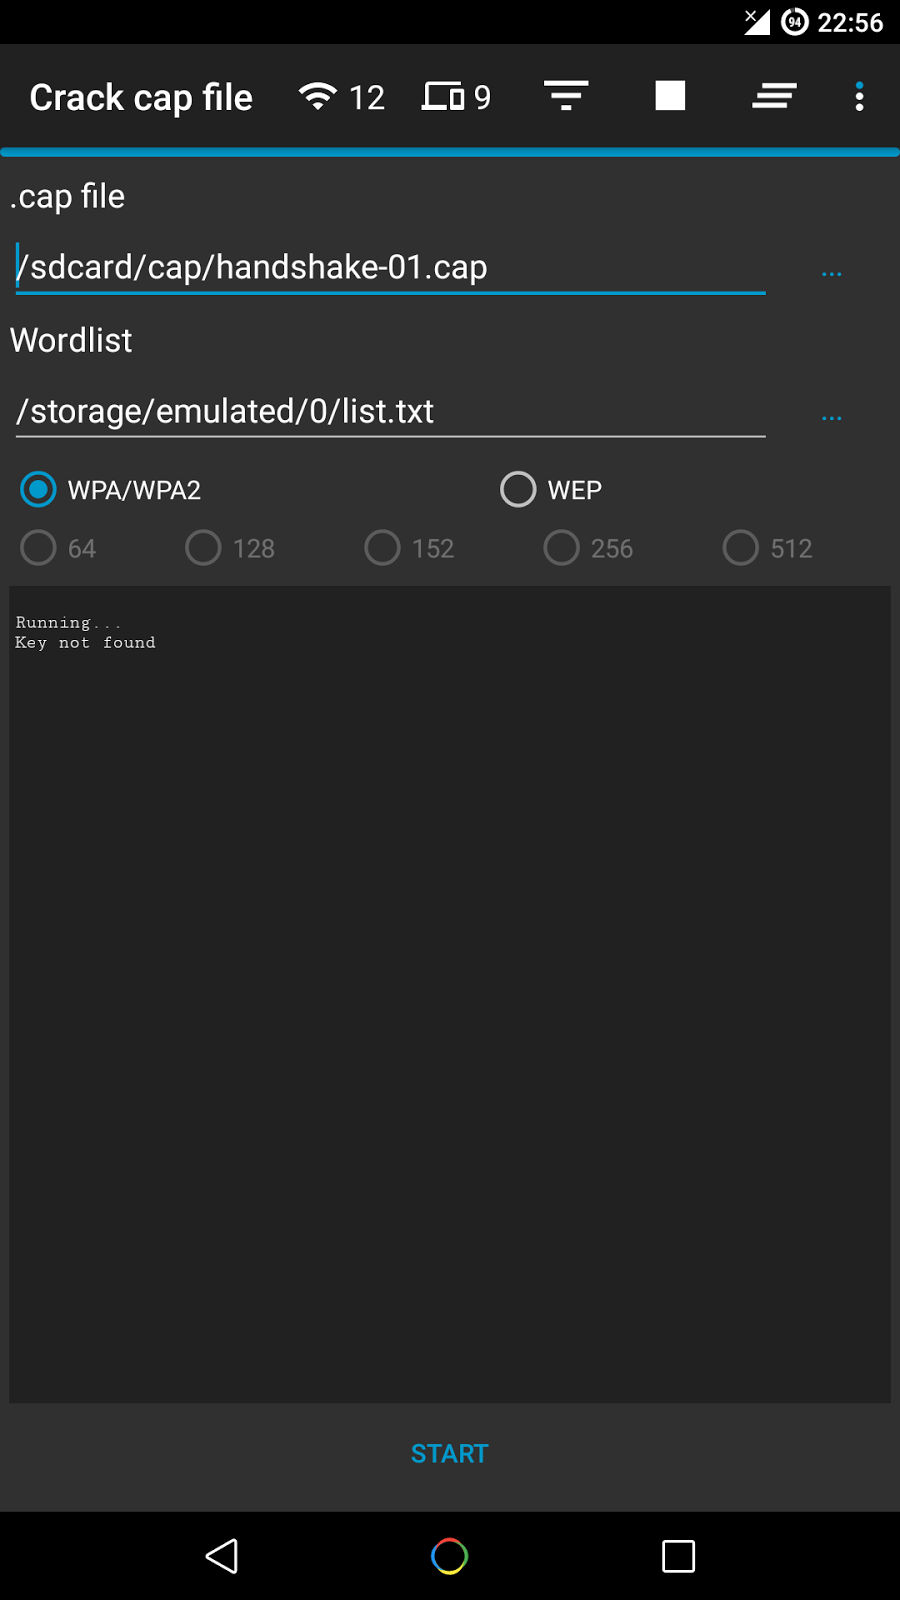
  • Capture a WPA handshake or gather IVs to crack a WEP network
  • Reaver WPS cracking (pixie-dust attack using NetHunter chroot and external adapter)

Other
  • Leave the app running in the background, optionally with a notification
  • Copy commands or MAC addresses to clipboard
  • Includes the required tools, no need for manual installation
  • Includes the nexmon driver and management utility for BCM4339 devices
  • Set commands to enable and disable monitor mode automatically
  • Crack .cap files with a custom wordlist
  • Create custom actions and run them on an access point or a client easily
  • Sort and filter Access Points with many parameters
  • Export all the gathered information to a file
  • Add an alias to a device (by MAC) for easier identification

Screenshots


Installation
Make sure:
  • you are on Android 5+
  • you are rooted (SuperSU is required, if you are on CM/LineageOS install SuperSU)
  • have a firmware to support Monitor Mode on your wireless interface

Download the latest version here.
When you run Hijacker for the first time, you will be asked whether you want to install the nexmon firmware or go to home screen. If you have installed your firmware or use an external adapter, you can just go to the home screen. Otherwise, click 'Install Nexmon' and follow the instructions. Keep in mind that on some devices, changing files in /system might trigger an Android security feature and your system partition will be restored when you reboot. After installing the firmware you will land on the home screen and airodump will start. Make sure you have enabled your WiFi and it's in monitor mode.

Troubleshooting
This app is designed and tested for ARM devices. All the binaries included are compiled for that architecture and will not work on anything else. You can check by going to settings: if you have the option to install nexmon, then you are on the correct architecture, otherwise you will have to install all the tools manually (busybox, aircrack-ng suite, mdk3, reaver, wireless tools, libfakeioctl.so library) and set the 'Prefix' option for the tools to preload the library they need.
In settings, there is an option to test the tools. If something fails, then you can click 'Copy test command' and select the tool that fails. This will copy a test command to your clipboard, which you can run in a terminal and see what's wrong. If all the tests pass and you still have a problem, feel free to open an issue here to fix it, or use the 'Send feedback' feature of the app in settings.
If the app happens to crash, a new activity will start which will generate a report in your external storage and give you the option to send it directly or by email. I suggest you do that, and if you are worried about what will be sent you can check it out yourself, it's just a txt file in your external storage directory. The part with the most important information is shown in the activity.
Please do not report bugs for devices that are not supported or when you are using an outdated version.
Keep in mind that Hijacker is just a GUI for these tools. The way it runs the tools is fairly simple, and if all the tests pass and you are in monitor mode, you should be getting the results you want. Also keep in mind that these are AUDITING tools. This means that they are used to TEST the integrity of your network, so there is a chance (and you should hope for it) that the attacks don't work on your network. It's not the app's fault, it's actually something to be happy about (given that this means that your network is safe). However, if an attack works when you type a command in a terminal, but not with the app, feel free to post here to resolve the issue. This app is still under development so bugs are to be expected.

Warning

Legal
It is highly illegal to use this application against networks for which you don't have permission. You can use it only on YOUR network or a network that you are authorized to. Using a software that uses a network adapter in promiscuous mode may be considered illegal even without actively using it against someone, and don't think for a second it's untracable. I am not responsible for how you use this application and any damages you may cause.

Device
The app gives you the option to install the nexmon firmware on your device. Even though the app performs a chipset check, you have the option to override it, if you believe that your device has the BCM4339 wireless adapter. However, installing a custom firmware intended for BCM4339 on a different chipset can possibly damage your device (and I mean hardware, not something that is fixable with factory reset). I am not responsible for any damage caused to your device by this software.


Share:

Saturday, November 25, 2017

Tool To Analyse Packets, Decoding , Scanning Ports, And Geolocation - CyberScan


CyberScan is an open source penetration testing tool that can analyse packets , decoding , scanning ports, pinging and geolocation of an IP including (latitude, longitude , region , country ...)


Operating Systems Supported
  • Windows XP/7/8/8.1/10
  • GNU/Linux
  • MacOSX

Installation
You can download CyberScan by cloning the Git repository:
git clone https://github.com/medbenali/CyberScan.git
cd CyberScan/
python CyberScan.py -v
CyberScan works out of the box with Python version 2.6.x and 2.7.x.


Share:

Thursday, November 16, 2017

Bash Script Purposed For System Enumeration, Vulnerability Identification And Privilege Escalation - MIDA-Multitool


Bash script purposed for system enumeration, vulnerability identification and privilege escalation.
MIDA Multitool draws functionality from several of my previous scripts namely SysEnum and RootHelper and is in many regards RootHelpers successor.
Besides functionality from these two previous scripts it incorporates some of it's own and as such aims to be a comprehensive assistant for operations and utilities related to system enumeration, vulnerability identification, exploitation and privilege escalation.


Usage
After a system has been succesfully compromised MIDA should be downloaded to the host in question either with git or wget, after it has been unpacked/cloned the shellscript needs to be made executable with chmod +x mida.sh
Upon doing so it can be run on the target host. The options available to the user are below.
The 'Usage' option prints this informational message. The option 'System Enumeration' attempts to retrieve system information such as OS and kernel details, network status, processes, system logs and more. 'Common Utilities' checks for the existence of useful utilities such as telnet, netcat, tcpdump etc. 'External Utilities' opens a menu which lets you download external utilities that may prove to be helpful with further enumeration, vulnerability identification and privilege escalation.
Finally the option 'Cleartext Credentials' searches for text and web application files that contain certain keywords in order to find potential cleartext passwords.

Scripts available for download with MIDA


Share:

Saturday, October 28, 2017

Scripted Local Linux Enumeration and Privilege Escalation Checks - LinEnum v0.6


LinEnum will automate many of the checks that I’ve documented in the Local Linux Enumeration & Privilege Escalation Cheatsheet. It’s a very basic shell script that performs over 65 checks, getting anything from kernel information to locating possible escalation points such as potentially useful SUID/GUID files and Sudo/rhost mis-configurations and more.

General usage:
version 0.6
  • Example: ./LinEnum.sh -k keyword -r report -e /tmp/ -t

OPTIONS:
  • -k Enter keyword
  • -e Enter export location
  • -t Include thorough (lengthy) tests
  • -r Enter report name
  • -h Displays this help text
Running with no options = limited scans/no output file
  • -e Requires the user enters an output location i.e. /tmp/export. If this location does not exist, it will be created.
  • -r Requires the user to enter a report name. The report (.txt file) will be saved to the current working directory.
  • -t Performs thorough (slow) tests. Without this switch default 'quick' scans are performed.
  • -k An optional switch for which the user can search for a single keyword within many files (documented below).

High-level summary of the checks/tasks performed by LinEnum:
  • Kernel and distribution release details
  • System Information:
    • Hostname
    • Networking details:
    • Current IP
    • Default route details
    • DNS server information
  • User Information:
    • Current user details
    • Last logged on users
    • Shows users logged onto the host
    • List all users including uid/gid information
    • List root accounts
    • Extracts password policies and hash storage method information
    • Checks umask value
    • Checks if password hashes are stored in /etc/passwd
    • Extract full details for ‘default’ uid’s such as 0, 1000, 1001 etc
    • Attempt to read restricted files i.e. /etc/shadow
    • List current users history files (i.e .bash_history, .nano_history etc.)
    • Basic SSH checks
  • Privileged access:
    • Determine if /etc/sudoers is accessible
    • Determine if the current user has Sudo access without a password
    • Are known ‘good’ breakout binaries available via Sudo (i.e. nmap, vim etc.)
    • Is root’s home directory accessible
    • List permissions for /home/
  • Environmental:
    • Display current $PATH
    • Displays env information
  • Jobs/Tasks:
    • List all cron jobs
    • Locate all world-writable cron jobs
    • Locate cron jobs owned by other users of the system
  • Services:
    • List network connections (TCP & UDP)
    • List running processes
    • Lookup and list process binaries and associated permissions
    • List inetd.conf/xined.conf contents and associated binary file permissions
    • List init.d binary permissions
  • Version Information (of the following):
    • Sudo
    • MYSQL
    • Postgres
    • Apache
      • Checks user config
      • Shows enabled modules
  • Default/Weak Credentials:
    • Checks for default/weak Postgres accounts
    • Checks for default/weak MYSQL accounts
  • Searches:
    • Locate all SUID/GUID files
    • Locate all world-writable SUID/GUID files
    • Locate all SUID/GUID files owned by root
    • Locate ‘interesting’ SUID/GUID files (i.e. nmap, vim etc)
    • List all world-writable files
    • Find/list all accessible *.plan files and display contents
    • Find/list all accessible *.rhosts files and display contents
    • Show NFS server details
    • Locate *.conf and *.log files containing keyword supplied at script runtime
    • List all *.conf files located in /etc
    • Locate mail
  • Platform/software specific tests:
    • Checks to determine if we're in a Docker container
    • Checks to see if the host has Docker installed

Share:

Tool to Detect Sandboxes and Analysis Environments in the Same Way as Malware Families Do - Pafish


Pafish is a demonstration tool that employs several techniques to detect sandboxes and analysis environments in the same way as malware families do.
The project is open source, you can read the code of all anti-analysis checks.

Scope
The objective of this project is to collect usual tricks seen in malware samples. This allows us to study them, and test if our analysis environments are properly implemented.

Build
Pafish is written in C and can be built with MinGW (gcc + make).
Check out "How to build" for detailed instructions.

Author
Alberto Ortega (@a0rtega - profile)

You can also download the executable of the latest stable version.

Share:

Advanced vulnerability scanning with Nmap NSE - Vulscan


Vulscan is a module which enhances nmap to a vulnerability scanner. The nmap option -sV enables version detection per service which is used to determine potential flaws according to the identified product. The data is looked up in an offline version of VulDB.

Installation
Please install the files into the following folder of your Nmap installation:
Nmap\scripts\vulscan\*

Usage
You have to run the following minimal command to initiate a simple vulnerability scan:
nmap -sV --script=vulscan/vulscan.nse www.example.com

Vulnerability Database
There are the following pre-installed databases available at the moment:

Single Database Mode
You may execute vulscan with the following argument to use a single database:
--script-args vulscandb=your_own_database
It is also possible to create and reference your own databases. This requires to create a database file, which has the following structure:
<id>;<title>
Just execute vulscan like you would by refering to one of the pre-delivered databases. Feel free to share your own database and vulnerability connection with me, to add it to the official repository.

Update Database
The vulnerability databases are updated and assembled on a regularly basis. To support the latest disclosed vulnerabilities, keep your local vulnerability databases up-to-date.
If you want to update your databases, go to the following web site and download these files:
Copy the files into your vulscan folder:
/vulscan/

Version Detection
If the version detection was able to identify the software version and the vulnerability database is providing such details, also this data is matched.
Disabling this feature might introduce false-positive but might also eliminate false-negatives and increase performance slighty. If you want to disable additional version matching, use the following argument:
--script-args vulscanversiondetection=0
Version detection of vulscan is only as good as Nmap version detection and the vulnerability database entries are. Some databases do not provide conclusive version information, which may lead to a lot of false-positives (as can be seen for Apache servers).

Match Priority
The script is trying to identify the best matches only. If no positive match could been found, the best possible match (with might be a false-positive) is put on display.
If you want to show all matches, which might introduce a lot of false-positives but might be useful for further investigation, use the following argument:
--script-args vulscanshowall=1

Interactive Mode
The interactive mode helps you to override version detection results for every port. Use the following argument to enable the interactive mode:
--script-args vulscaninteractive=1

Reporting
All matching results are printed one by line. The default layout for this is:
[{id}] {title}\n
It is possible to use another pre-defined report structure with the following argument:
--script-args vulscanoutput=details
--script-args vulscanoutput=listid
--script-args vulscanoutput=listlink
--script-args vulscanoutput=listtitle
You may enforce your own report structure by using the following argument (some examples):
--script-args vulscanoutput='{link}\n{title}\n\n'
--script-args vulscanoutput='ID: {id} - Title: {title} ({matches})\n'
--script-args vulscanoutput='{id} | {product} | {version}\n'
Supported are the following elements for a dynamic report template:
  • {id} - ID of the vulnerability
  • {title} - Title of the vulnerability
  • {matches} - Count of matches
  • {product} - Matched product string(s)
  • {version} - Matched version string(s)
  • {link} - Link to the vulnerability database entry
  • \n - Newline
  • \t - Tab
Every default database comes with an url and a link, which is used during the scanning and might be accessed as {link} within the customized report template. To use custom database links, use the following argument:
--script-args "vulscandblink=http://example.org/{id}"

Disclaimer
Keep in mind that this kind of derivative vulnerability scanning heavily relies on the confidence of the version detection of nmap, the amount of documented vulnerebilities and the accuracy of pattern matching. The existence of potential flaws is not verified with additional scanning nor exploiting techniques.


Share:

Saturday, October 7, 2017

An Interactive Disassembler for x86/ARM/MIPS - Plasma


PLASMA is an interactive disassembler. It can generate a more readable assembly (pseudo code) with colored syntax. You can write scripts with the available Python api (see an example below). The project is still in big development.

wiki : TODO list and some documentation.

It supports :
  • architectures : x86{64}, ARM, MIPS{64} (partially for ARM and MIPS)
  • formats : ELF, PE, RAW
Warning: until structures and type definitions are not implemented, the database compatibility could be broken.

Requirements
Optional :
  • python-qt4 used for the memory map
  • keystone for the script asm.py

Installation
./install.sh
Or if you have already installed requirements with the previous command :
./install.sh --update
Check tests :
make
....................................................................................
84/84 tests passed successfully in 2.777975s
analyzer tests...
...

Pseudo-decompilation of functions
$ plasma -i tests/server.bin
>> v main
# you can press tab to show the pseudo decompilation
# | to split the window
# See the command help for all shortcuts

Qt memory map (memmap)
The image is actually static.

Scripting (Python API)
See more on the wiki for the API.
Some examples (these scripts are placed in plasma/scripts) :
$ plasma -i FILE
plasma> py !strings.py             # print all strings
plasma> py !xrefsto.py FUNCTION    # xdot call graph
plasma> py !crypto.py              # detect some crypto constants
plasma> py !asm.py CODE            # assemble with keystone
plasma> py !disasm.py HEX_STRING   # disassemble a buffer


Share:

PowerShell Remote Download Cradle Generator and Obfuscator - Invoke-CradleCrafter


Invoke-CradleCrafter is a PowerShell v2.0+ compatible PowerShell remote download cradle generator and obfuscator.

Purpose

Invoke-CradleCrafter exists to aid Blue Teams and Red Teams in easily exploring, generating and obfuscating PowerShell remote download cradles. In addition, it helps Blue Teams test the effectiveness of detections that may work for output produced by Invoke-Obfuscation but may fall short when dealing with Invoke-CradleCrafter since it does not contain any string concatenations, encodings, tick marks, type casting, etc.

Another important component of this research and tool development was to effectively highlight the high-level behavior and artifacts left behind when each cradle is executed. I have tried to highlight this information when you first enter a new cradle type in the interactive menus of the tool.

Ultimately, knowing more about each cradle's behavior and artifacts will help the Blue Team better detect these cradles. This knowledge should also benefit the Red Teamer in making more informed selections of which cradle to use in a given scenario.

Usage

While all of the cradles can be produced by directly calling the Out-Cradle function, the complexity of the moving pieces for all of the stacked obfuscated components makes using the Invoke-CradleCrafter function the easiest way to explorer and visualize the cradle syntaxes and obfuscation techniques that this framework currently supports.

Installation

The source code for Invoke-CradleCrafter is hosted at Github, and you may download, fork and review it from the repository. Please report issues or feature requests through Github's bug tracker associated with this project.

To install:
Import-Module ./Invoke-CradleCrafter.psd1
Invoke-CradleCrafter

Release Notes
v1.0 - 2017-04-28 x33fcon (Gdynia, Poland): PUBLIC Release of Invoke-CradleCrafter.
v1.1 - 2017-05-11 NOPcon (Istanbul, Turkey): Added 3 new memory-based cradles:
  • PsComMsXml
  • PsInlineCSharp
  • PsCompiledCSharp Added 2 disk-based cradles:
  • PsBits
  • BITSAdmin

Share:

Thursday, September 21, 2017

A Tool That Enumerates Android Devices For Information Useful In Understanding Its Internals And For Exploit Development - Twiga


A tool that enumerates Android devices for information useful in understanding its internals and for exploit development. It supports android 4.2 to android 7.1.1

Requirements
  • The most current ADB must be in your path and fully functional
  • The report name must not have any whitespace

Limitations
  • Some information and files cannot be pulled higher up the SDK version due to strict SELinux policies and android hardening.
  • It can only run on one device at a time for now

To Do
  • Support for enumeration on a rooted device
  • Support enumeration on multiple devices at a time
  • Generate PDF report on the enumartuon data

Inspired by


Share:

An IoT Network Security Analysis Tool and Visualizer - ASTo


ASTo is security analysis tool for IoT networks. It is developed to support the Apparatus security framework. ASTo is based on electron and cytoscape.js. The icons are provided by Google's Material Design.

The application is still in prototyping stage, which means a lot of functionality is being added with each commit, along with massive changes in almost everything.

Screenshots


To Use
To clone and run this repository you'll need Git and Node.js installed on your computer. To download and install the app, type the following in your terminal:
# Clone this repository
git clone https://github.com/Or3stis/apparatus.git
# Go into the repository
cd apparatus
# Install dependencies
npm install
# to run the app
npm start
Because the app is still in prototype stage, it is best to keep up to date with the most recent commits. To do so, before starting the app, type:
# inside the apparatus directory

# update to latest
git pull
The first window (home screen) will ask you to choose which modeling phase would you like to perform analysis in. After you select a phase, a native dialog window will be displayed and ask you choose a file to load. By default, you can only choose .js or .json files.
You will find some example graphs in the graphs folder.

Instructions

If you want to contribute that's great news. Check the contributing guide. The application is being developed on Mac. That means that new commits might introduce breaking changes in other platforms. Especially commits that involve access to the file system. If something is not working, don't hesitate to create an issue.
If you want to find out how the app works check the wiki.
You can check the project's planned features in the roadmap.


Share:
Copyright © Offensive Sec Blog | Powered by OffensiveSec
Design by OffSec | Theme by Nasa Records | Distributed By Pirate Edition