0Day to Buy
 Anti-Spy
 Exposed Leak
 #Op
#Op Cyber War
 Home
Home Hacking Tools
 Hacking Online Tools
 Pr1v8
Pr1v8 Google Hacking DB
 All
All


0x00 Introduce
Tool introduction
Kunyu (kunyu), whose name is taken from , is actually a professional subject related to geographic information, which counts the geographic information of the sea, land, and sky. The same applies to cyberspace. The same is true for discovering unknown and fragile assets. It is more like a cyberspace map, which is used to comprehensively describe and display cyberspace assets, various elements of cyberspace and the relationship between elements, as well as cyberspace and real space. The mapping relationship. So I think "Kun Yu" still fits this concept.
Kunyu aims to make corporate asset collection more efficient and enable more security-related practitioners to understand and use cyberspace surveying and mapping technology.
For the use of kunyu, there can be many application scenarios, such as:
- Forgotten and isolated assets in the enterprise are identified and added to security management.
- Perform quick investigation and statistics on externally exposed assets of the enterprise.
- Red and blue are used against related requirements, and batch inspections of captured IPs are performed.
- Collect vulnerable assets in batches (0day/1day) for equipment and terminals within the impact.
- Information on sites involved in new-type cybercrime cases is quickly collected and merged for more efficient research, judgment, and analysis.
- Statistic and reproduce the fragile assets on the Internet that are affected by related vulnerabilities.
0x01 Install
Need Python3 or higher support
git clone https://github.com/knownsec/Kunyu.git
cd Kunyu
pip3 install -r requirements.txt

Linux:
	python3 setup.py install
	kunyu console

Windows:
	cd kunyu
	python3 console.py

PYPI:
	pip3 install kunyu

P.S. Windows also supports python3 setup.py install.
0x02 Configuration instructions
When you run the program for the first time, you can initialize by entering the following command. Other login methods are provided. However, it is recommended to use the API method. Because the user name/password login requires an additional request, the API method is theoretically more efficient.
kunyu init --apikey <your zoomeye key> --seebug <your seebug key>

You need to log in with ZoomEye credentials before using this tool for information collection.
Visit address: https://www.zoomeye.org/
The output file path can be customized by the following command
kunyu init --output C:\Users\风起\kunyu\output

0x03 Tool instructions
Detailed command
kunyu console
ZoomEye
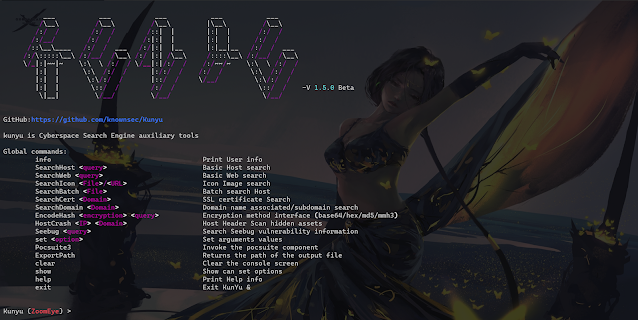
Global commands:
        info                                      Print User info
        SearchHost <query>                        Basic Host search
        SearchWeb <query>                         Basic Web search
        SearchIcon <File>/<URL>                   Icon Image search
        SearchBatch <File>                        Batch search Host
        SearchCert <Domain>                       SSL certificate Search
        SearchDomain <Domain>                     Domain name associated/subdomain search
        EncodeHash <encryption> <query>           Encryption method interface
        HostCrash <IP> <Domain>                   Host Header Scan hidden assets
        Seebug <Query>                            Search Seebug vulnerability information
        set <Option>                              Set arguments values
        Pocsuite3                                    Invoke the pocsuite component
        ExportPath                                Returns the path of the output file
        clear                                     Clear the console screen
        show                                      Show can set options
        help                                      Print Help info
        exit                                      Exit KunYu &
OPTIONS
ZoomEye:
	page <Number>    				The number of pages returned by the query
	dtype <0/1>      				Query associated domain name/subdomain name
	btype <host/web> 				Set the API interface for batch query
Use case introduction
Here we use the ZoomEye module for demonstration
User information query

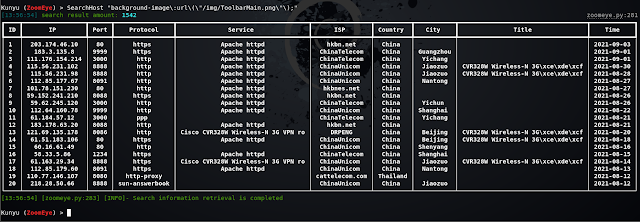
HOST host search

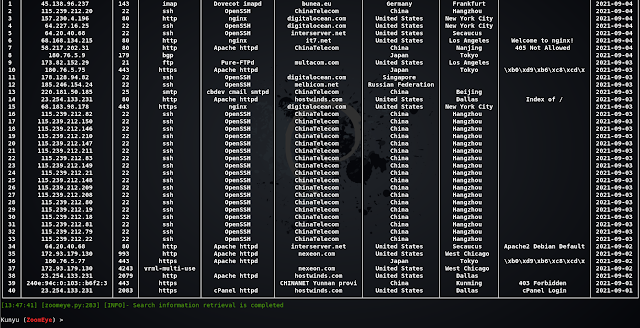
Web host search
Batch IP search

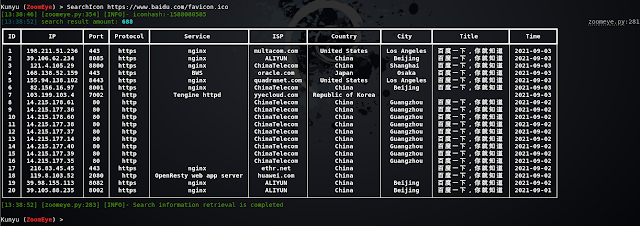
Icon Search
When collecting corporate assets, we can use this method to retrieve the same ico icon assets, which usually has a good effect when associating related corporate assets. But it should be noted that if some sites also use this ico icon, irrelevant assets may be associated (but people who are bored with other people's ico icons are always in the minority). Support url or local file search.
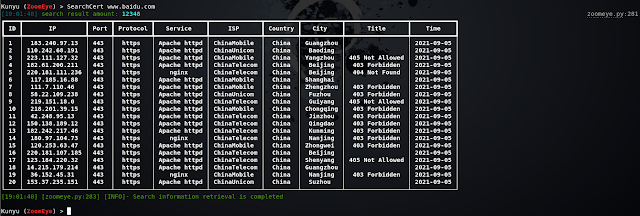
SSL certificate search
Query through the serial number of the SSL certificate, so that the associated assets are more accurate, and services that use the same certificate can be searched. When you encounter an https site, you can use this method.
Multi-factor query
Similarly, Kunyu also supports multi-factor conditional query related assets, which can be realized through ZoomEye logic operation syntax.
Feature Search
Through HTTP request packet features or website-related features, the same framework assets can be concatenated more accurately

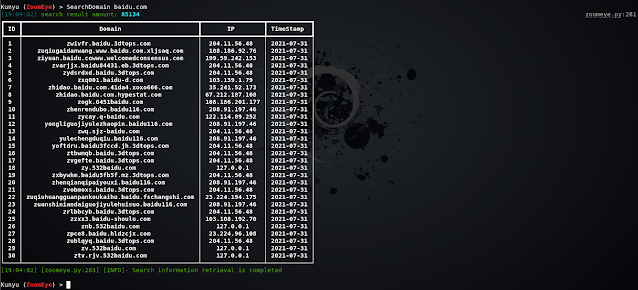
Associated Domain/Subdomain Search
Search for associated domain names and subdomains, and query associated domain names by default. Two modes can be set by setting the dtype parameter.
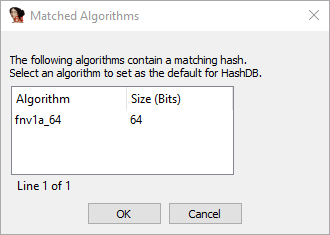
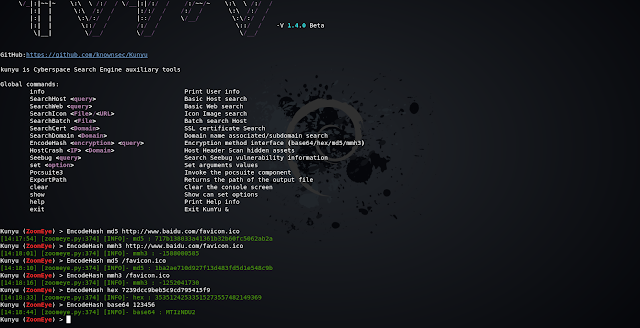
Encoding hash calculation
In some scenarios, you can use this command to perform common HASH encryption/encoding, such as BASE64, MD5, mmh3, HEX encoding, and debug in this way.
Seebug vulnerability query
You can query historical related vulnerabilities by entering information about the framework and equipment you want to find, but you need to note that only English is supported, and improvements and upgrades will be made later.

Setting parameters
When set page = 2, the returned results are 40. You can modify the page parameter to set the number of pages to be queried. Note that 1 page = 20/items. You can modify the value according to your needs to get more returned results.
The configurable parameters and the current values of the parameters are displayed through show.

Pocsuite linkage
In versions after v1.3.1, you can use kunyu to link the console mode of pocsuite3 for integrated use.

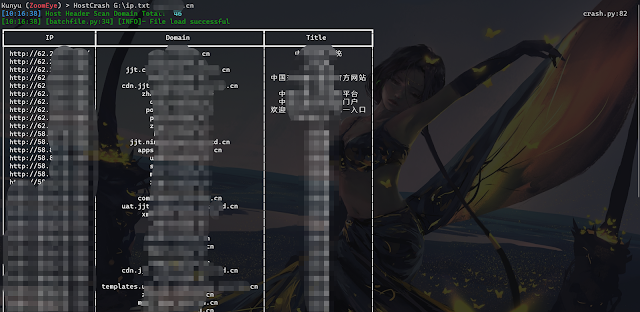
HOSTS head collision
Through the HOSTS collision, the hidden assets in the intranet can be effectively collided, and the intranet service can be accessed according to the ServerName domain name and IP configured in the middleware httpf.conf. This can be achieved by setting the local hosts file later, because the local hosts file takes precedence. The level is higher than DNS server resolution. Support reverse check through ZoomEye domain name library or read TXT file to get the list of domain names.
HOSTS cross collision
Data result
All search results are saved in the user's root directory, and the directory is created based on the current timestamp. All query results of a single start are stored in an Excel format under one directory, giving a more intuitive experience. The output path can be returned through the ExportPath command.

0x04 Loading
In fact, there are still many ideas, but as an Alpha version, this is the case, and it will continue to be improved in the later period. I hope that Kunyu can be known to more security practitioners. Thank you for your support.
The tool framework has reference to Kunlun Mirror and Pocsuite3, which are all very good works.
Thanks to all the friends of KnownSec 404 Team.
“ 看得清 ” 是能力的体现,是 “ 器 ” ,而 “ 看得见 ” 就是思想的体现,那最后关联的是 “ 道 ”。
--SuperHei
0x05 Issue
1、Multi-factor search
ZoomEye search can use multi-factor search, dork:cisco +port:80 (note the space) can search all data that meet the conditions of cisco and port:80, if there is no space in between, it is the same search condition, it is that cisco is satisfied and the port is All data for 80. Kunyu's dork does not require quotation marks.
2、High-precision geographical location
ZoomEye gives privileged users high-precision geographic location data, but it should be noted that ordinary users do not have this function, so I hope you know.
3、Username/password login
If you use username/password as the initialization condition, the token will be valid for 12 hours. If you find that your search cannot return data, you may wish to info. If the session times out, the initialization command prompt will be returned. In most cases, we recommend that you use the API KEY method, there is no invalidation problem. This design is also for the security of your account and password. After all, the API KEY can be reset and the token will become invalid. However, with the account and password, it is possible to log in to your ZoomEye account.
4、Cert certificate search
It should be noted that, according to the normal logic, you need to encode the serial number of the target SSL certificate in hexadecimal to match the sentence search, but Kunyu only needs to provide the Domain address to search. The principle is to make a request to the target station to obtain the serial number and process it, but if your host cannot access the target that needs to be searched, it cannot be retrieved. At this time, you can also search with the sentence in the usual way.
5、Favicon icon search
ico icon search not only supports URL retrieval, but also supports local ico icon file search, which has better scalability and compatibility.
6、Query data save path
By default, your query data is in the Kunyu folder under the user directory. You can also use the ExportPath command to query the path in the console mode.
7、Autocomplete
Kunyu's auto-completion supports upper and lower case, command logging, etc., use Tab to complete, please refer to Metasploit for usage.
8. Regarding the error when using pip install kunyu
The following error was reported when using pip install kunyu: File "C:\Users\风起\AppData\Local\Programs\Python\Python37\Scripts\kunyu-script.py", line 1 SyntaxError: Non-UTF-8 code starting with'\xb7' in file C: \Users\风起\AppData\Local\Programs\Python\Python37\Scripts\kunyu-script.py on line 1, but no encoding declared; see http://python.org/dev/peps/pep-0263/ for details
solution: Modify the C:\Users\风起\AppData\Local\Programs\Python\Python37\Scripts\kunyu-script.py file and add # encoding: utf-8 at the beginning of the file.
Then save it and you can use it normally. The bug appears because there is a Chinese name in the user's directory path, which usually appears on windows.
9. Pocsuite3 module POC storage directory
When using the pocsuite3 module, if you want to add a new POC module, you can add a POC file in project directory/kunyu/pocs/.
10. Pocsuite3 module POC missing issue
When using the Pocsuite command linkage, if it is a packaged Kunyu version, the poc has been fixed. At this time, modifying the poc directory cannot add new modules. At this time, you can repackage it or use the project directory/kunyu /console.py Run kunyu to update the poc module in real time.
0x06 Contributions
风起@knownsec 404
wh0am1i@knownsec 404
fenix@knownsec 404
0x7F@knownsec 404
0x07 Community
If you have any questions, you can submit an issue under the project, or contact us through the following methods.
Scan the QR code to add the ZoomEye staff member WeChat, and remark Kunyu, which will draw everyone to the ZoomEye cyberspace surveying and mapping exchange group