Security of Information, Threat Intelligence, Hacking, Offensive Security, Pentest, Open Source, Hackers Tools, Leaks, Pr1v8, Premium Courses Free, etc

  • Penetration Testing Distribution - BackBox

    BackBox is a penetration test and security assessment oriented Ubuntu-based Linux distribution providing a network and informatic systems analysis toolkit. It includes a complete set of tools required for ethical hacking and security testing...
  • Pentest Distro Linux - Weakerth4n

    Weakerth4n is a penetration testing distribution which is built from Debian Squeeze.For the desktop environment it uses Fluxbox...
  • The Amnesic Incognito Live System - Tails

    Tails is a live system that aims to preserve your privacy and anonymity. It helps you to use the Internet anonymously and circumvent censorship...
  • Penetration Testing Distribution - BlackArch

    BlackArch is a penetration testing distribution based on Arch Linux that provides a large amount of cyber security tools. It is an open-source distro created specially for penetration testers and security researchers...
  • The Best Penetration Testing Distribution - Kali Linux

    Kali Linux is a Debian-based distribution for digital forensics and penetration testing, developed and maintained by Offensive Security. Mati Aharoni and Devon Kearns rewrote BackTrack...
  • Friendly OS designed for Pentesting - ParrotOS

    Parrot Security OS is a cloud friendly operating system designed for Pentesting, Computer Forensic, Reverse engineering, Hacking, Cloud pentesting...

Sunday, February 6, 2022

AzureHunter - A Cloud Forensics Powershell Module To Run Threat Hunting Playbooks On Data From Azure And O365


A Powershell module to run threat hunting playbooks on data from Azure and O365 for Cloud Forensics purposes.


Getting Started

1. Check that you have the right O365 Permissions

The following roles are required in Exchange Online, in order to be able to have read only access to the UnifiedAuditLog: View-Only Audit Logs or Audit Logs.

These roles are assigned by default to the Compliance Management role group in Exchange Admin Center.

NOTE: if you are a security analyst, incident responder or threat hunter and your organization is NOT giving you read-only access to these audit logs, you need to seriously question what their detection and response strategy is!

More information:

NOTE: your admin can verify these requirements by running Get-ManagementRoleEntry "*\Search-UnifiedAuditLog" in your Azure tenancy cloud shell or local powershell instance connected to Azure.


2. Ensure ExchangeOnlineManagement v2 PowerShell Module is installed

Please make sure you have ExchangeOnlineManagement (EXOv2) installed. You can find instructions on the web or go directly to my little KB on how to do it at the soc analyst scrolls


3. Either Clone the Repo or Install AzureHunter from the PSGallery

3.1 Cloning the Repo
  1. Clone this repository
  2. Import the module Import-Module .\source\AzureHunter.psd1

3.2 Install AzureHunter from the PSGallery

All you need to do is:

Install-Module AzureHunter -Scope CurrentUser
Import-Module AzureHunter

What is the UnifiedAuditLog?

The unified audit log contains user, group, application, domain, and directory activities performed in the Microsoft 365 admin center or in the Azure management portal. For a complete list of Azure AD events, see the list of RecordTypes.

The UnifiedAuditLog is a great source of cloud forensic information since it contains a wealth of data on multiple types of cloud operations like ExchangeItems, SharePoint, Azure AD, OneDrive, Data Governance, Data Loss Prevention, Windows Defender Alerts and Quarantine events, Threat intelligence events in Microsoft Defender for Office 365 and the list goes on and on!


AzureHunter Data Consistency Checks

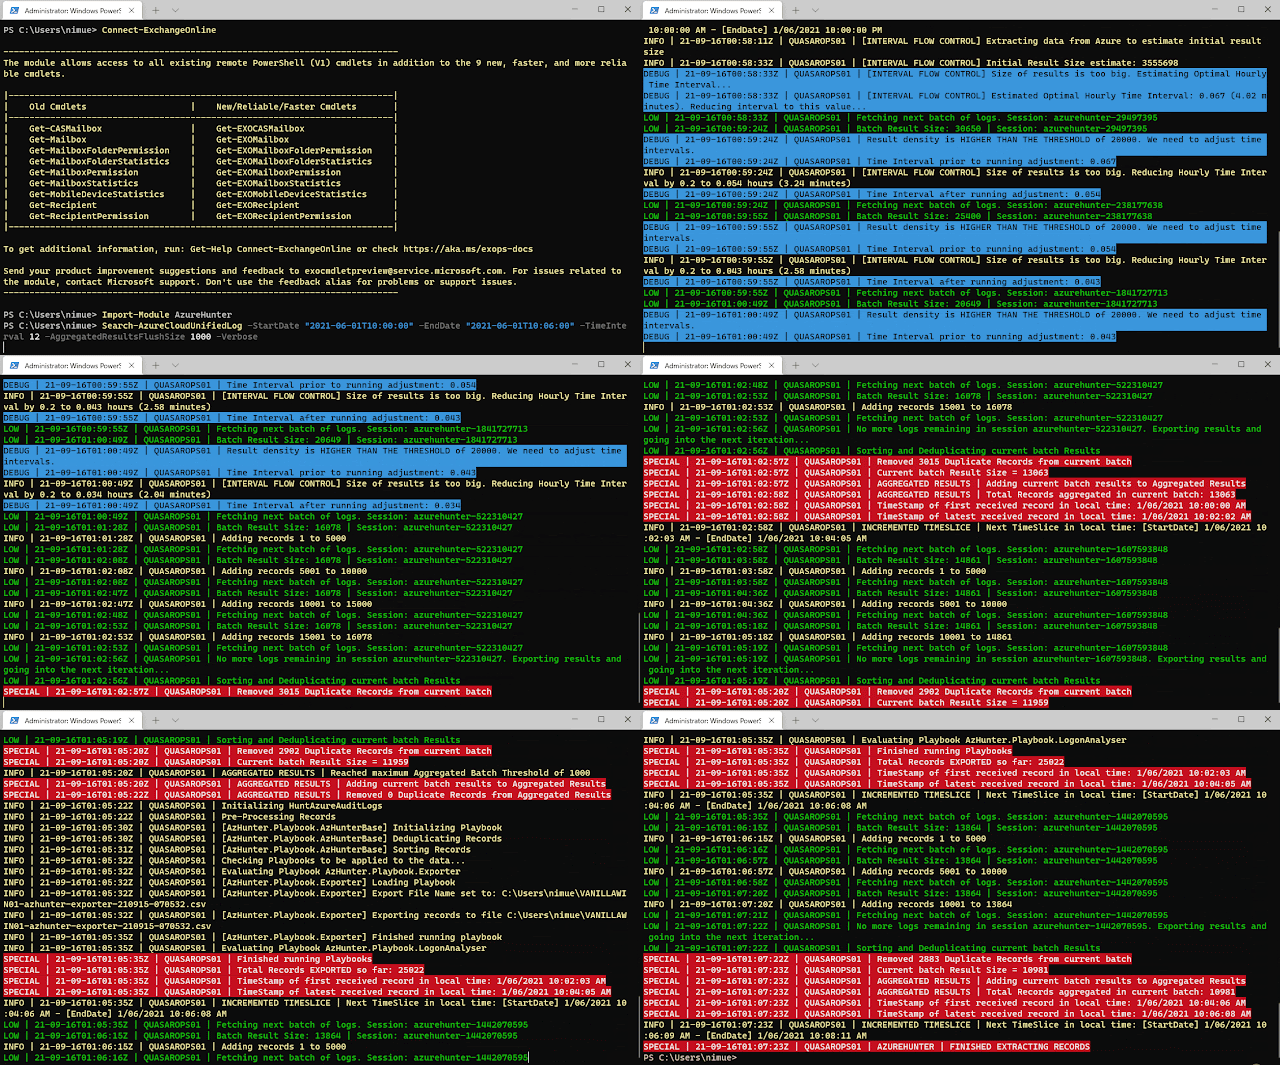
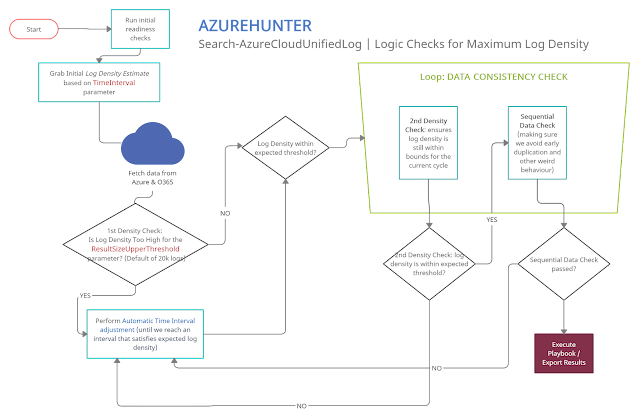
AzureHunter implements some useful logic to ensure that the highest log density is mined and exported from Azure & O365 Audit Logs. In order to do this, we run two different operations for each cycle (batch):

  1. Automatic Window Time Reduction: this check ensures that the time interval is reduced to the optimal interval based on the ResultSizeUpperThreshold parameter which by default is 20k. This means, if the amounts of logs returned within your designated TimeInterval is higher than ResultSizeUpperThreshold, then an automatic adjustment will take place.
  2. Sequential Data Check: are returned Record Indexes sequentially valid?


Usage

Ensure you connect to ExchangeOnline

It's recommended that you run Connect-ExchangeOnline before running any AzureHunter commands. The program checks for an active remote session and attempts to connect but some versions of Powershell don't allow this and you need to do it yourself regardless.


Run AzureHunter

AzureHunter has two main commands: Search-AzureCloudUnifiedLog and Invoke-HuntAzureAuditLogs.

The purpose of Search-AzureCloudUnifiedLog is to implement a complex logic to ensure that the highest percentage of UnifiedAuditLog records are mined from Azure. By default, it will export extracted and deduplicated records to a CSV file.

The purpose of Invoke-HuntAzureAuditLogs is to provide a flexible interface into hunting playbooks stored in the playbooks folder. These playbooks are designed so that anyone can contribute with their own analytics and ideas. So far, only two very simple playbooks have been developed: AzHunter.Playbook.Exporter and AzHunter.Playbook.LogonAnalyser. The Exporter takes care of exporting records after applying de-duplication and sorting operations to the data. The LogonAnalyser is in beta mode and extracts events where the Operations property is UserLoggedIn. It is an example of what can be done with the playbooks and how easy it is to construct one.

When running Search-AzureCloudUnifiedLog, you can pass in a list of playbooks to run per log batch. Search-AzureCloudUnifiedLog will pass on the batch to the playbooks via Invoke-HuntAzureAuditLogs.

Finally Invoke-HuntAzureAuditLogs can, be used standalone. If you have an export of UnifiedAuditLog records, you can load them into a Powershell Array and pass them on to this command and specify the relevant playbooks.


Example 1 | Run search on Azure UnifiedAuditLog and extract records to CSV file (default behaviour)
Search-AzureCloudUnifiedLog -StartDate "2020-03-06T10:00:00" -EndDate "2020-06-09T12:40:00" -TimeInterval 12 -AggregatedResultsFlushSize 5000 -Verbose

This command will:

  • Search data between the dates in StartDate and EndDate
  • Implement a window of 12 hours between these dates, which will be used to sweep the entire length of the time interval (StartDate --> EndDate). This window will be automatically reduced and adjusted to provide the maximum amount of records within the window, thus ensuring higher quality of output. The time window slides sequentially until reaching the EndDate.
  • The AggregatedResultsFlushSize parameter speficies the batches of records that will be processed by downstream playbooks. We are telling AzureHunter here to process the batch of records once the total amount reaches 5000. This way, you can get results on the fly, without having to wait for hours until a huge span of records is exported to CSV files.

Example 2 | Run Hunting Playbooks on CSV File

We assume that you have exported UnifiedAuditLog records to a CSV file, if so you can then do:

$RecordArray = Import-Csv .\my-exported-records.csv
Invoke-HuntAzureAuditLogs -Records $RecordArray -Playbooks 'AzHunter.Playbook.LogonAnalyser'

You can run more than one playbook by separating them via commas, they will run sequentially:

$RecordArray = Import-Csv .\my-exported-records.csv
Invoke-HuntAzureAuditLogs -Records $RecordArray -Playbooks 'AzHunter.Playbook.Exporter', 'AzHunter.Playbook.LogonAnalyser'

Why?

Since the aftermath of the SolarWinds Supply Chain Compromise many tools have emerged out of deep forges of cyberforensicators, carefully developed by cyber blacksmith ninjas. These tools usually help you perform cloud forensics in Azure. My intention with AzureHunter is not to bring more noise to this crowded space, however, I found myself in the need to address some gaps that I have observed in some of the tools in the space (I might be wrong though, since there is a proliferation of tools out there and I don't know them all...):

  1. Azure cloud forensic tools don't usually address the complications of the Powershell API for the UnifiedAuditLog. This API is very unstable and inconsistent when exporting large quantities of data. I wanted to develop an interface that is fault tolerant (enough) to address some of these issues focusing solely on the UnifiedAuditLog since this is the Azure artefact that contains the most relevant and detailed activity logs for users, applications and services.
  2. Azure cloud forensic tools don't usually put focus on developing extensible Playbooks. I wanted to come up with a simple framework that would help the community create and share new playbooks to extract different types of meaning off the same data.

If, however, you are looking for a more feature rich and mature application for Azure Cloud Forensics I would suggest you check out the excellent work performed by the cyber security experts that created the following applications:

I'm sure there is a more extensive list of tools, but these are the ones I could come up with. Feel free to suggest some more.


Why Powershell?
  1. I didn't want to re-invent the wheel
  2. Yes the Powershell interface to Azure's UnifiedAuditLog is unstable, but in terms of time-to-production it would have taken me an insane amount of hours to achieve the same thing writing a whole new interface in languages such as .NET, Golang or Python to achieve the same objectives. In the meanwhile, the world of Cyber Defense and Response does not wait!

TODO
  • Specify standard playbook metadata attributes that need to be present so that AzureHunter can leverage them.
  • Allow for playbooks to specify dependencies on other playbooks so that one needs to be run before the other. Playbook chaining could produce interesting results and avoid code duplication.
  • Develop Pester tests and Coveralls results.
  • Develop documentation in ReadTheDocs.
  • Allow for the specification of playbooks in SIGMA rule standard (this might require some PR to the SIGMA repo)

More Information

For more information


Credits


Share:

Koppeling - Adaptive DLL Hijacking / Dynamic Export Forwarding


This project is a demonstration of advanced DLL hijack techniques. It was released in conjunction with the "Adaptive DLL Hijacking" blog post. I recommend you start there to contextualize this code.

This project is comprised of the following elements:

  • Harness.exe: The "victim" application which is vulnerable to hijacking (static/dynamic)
  • Functions.dll: The "real" library which exposes valid functionality to the harness
  • Theif.dll: The "evil" library which is attempting to gain execution
  • NetClone.exe: A C# application which will clone exports from one DLL to another
  • PyClone.py: A python 3 script which mimics NetClone functionality

The VS solution itself supports 4 build configurations which map to 4 different methods of proxying functionality. This should provide a nice scalable way of demonstrating more techniques in the future.

  • Stc-Forward: Forwards export names during the build process using linker comments
  • Dyn-NetClone: Clones the export table from functions.dll onto theif.dll post-build using NetClone
  • Dyn-PyClone: Clones the export table from functions.dll onto theif.dll post-build using PyClone
  • Dyn-Rebuild: Rebuilds the export table and patches linked import tables post-load to dynamically prepare for function proxying

The goal of each technique is to successfully capture code execution while proxying functionality to the legitimate DLL. Each technique is tested to ensure static and dynamic sink situations are handled. This is by far not every primitive or technique variation. The post above goes into more detail.


Example

Prepare a hijack scenario with an obviously incorrect DLL

> copy C:\windows\system32\whoami.exe .\whoami.exe
1 file(s) copied.

> copy C:\windows\system32\kernel32.dll .\wkscli.dll
1 file(s) copied.

Executing in the current configuration should result in an error

> whoami.exe 

"Entry Point Not Found"

Convert kernel32 to proxy functionality for wkscli

> NetClone.exe --target C:\windows\system32\kernel32.dll --reference C:\windows\system32\wkscli.dll --output wkscli.dll
[+] Done.

> whoami.exe
COMPUTER\User


Share:

Kunyu - More Efficient Corporate Asset Collection


0x00 Introduce

Tool introduction

Kunyu (kunyu), whose name is taken from , is actually a professional subject related to geographic information, which counts the geographic information of the sea, land, and sky. The same applies to cyberspace. The same is true for discovering unknown and fragile assets. It is more like a cyberspace map, which is used to comprehensively describe and display cyberspace assets, various elements of cyberspace and the relationship between elements, as well as cyberspace and real space. The mapping relationship. So I think "Kun Yu" still fits this concept.

Kunyu aims to make corporate asset collection more efficient and enable more security-related practitioners to understand and use cyberspace surveying and mapping technology.


Application scenario

For the use of kunyu, there can be many application scenarios, such as:

  • Forgotten and isolated assets in the enterprise are identified and added to security management.
  • Perform quick investigation and statistics on externally exposed assets of the enterprise.
  • Red and blue are used against related requirements, and batch inspections of captured IPs are performed.
  • Collect vulnerable assets in batches (0day/1day) for equipment and terminals within the impact.
  • Information on sites involved in new-type cybercrime cases is quickly collected and merged for more efficient research, judgment, and analysis.
  • Statistic and reproduce the fragile assets on the Internet that are affected by related vulnerabilities.

0x01 Install

Need Python3 or higher support

git clone https://github.com/knownsec/Kunyu.git
cd Kunyu
pip3 install -r requirements.txt

Linux:
python3 setup.py install
kunyu console

Windows:
cd kunyu
python3 console.py

PYPI:
pip3 install kunyu

P.S. Windows also supports python3 setup.py install.

0x02 Configuration instructions

When you run the program for the first time, you can initialize by entering the following command. Other login methods are provided. However, it is recommended to use the API method. Because the user name/password login requires an additional request, the API method is theoretically more efficient.

kunyu init --apikey <your zoomeye key> --seebug <your seebug key>


You need to log in with ZoomEye credentials before using this tool for information collection.

Visit address: https://www.zoomeye.org/

The output file path can be customized by the following command

kunyu init --output C:\Users\风起\kunyu\output


0x03 Tool instructions

Detailed command

kunyu console


ZoomEye

Encryption method interface HostCrash <IP> <Domain> Host Header Scan hidden assets Seebug <Query> Search Seebug vulnerability information set <Option> Set arguments values Pocsuite3 Invoke the pocsuite component ExportPath Returns the path of the output file clear Clear the console screen show Show can set options help Print Help info exit Exit KunYu & ">
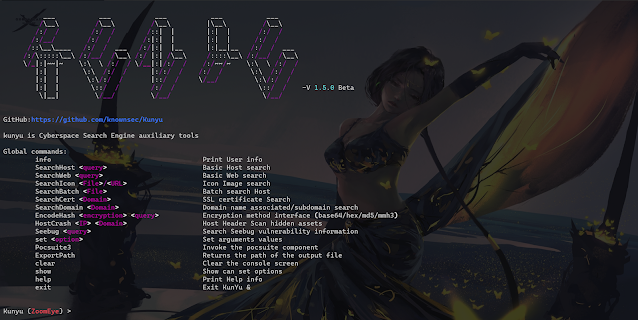
Global commands:
info Print User info
SearchHost <query> Basic Host search
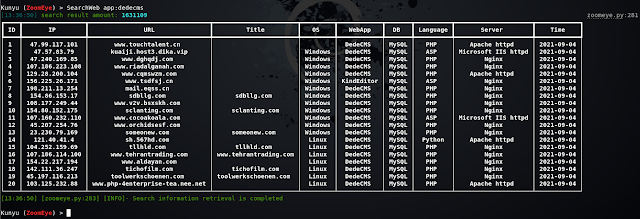
SearchWeb <query> Basic Web search
SearchIcon <File>/<URL> Icon Image search
SearchBatch <File> Batch search Host
SearchCert <Domain> SSL certificate Search
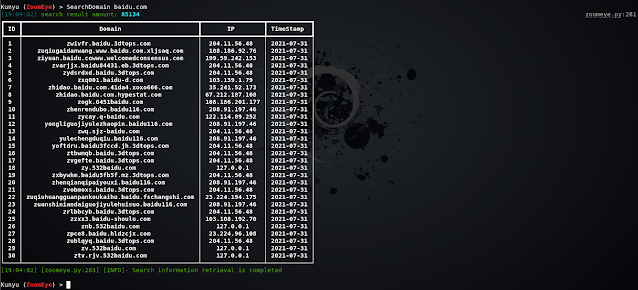
SearchDomain <Domain> Domain name associated/subdomain search
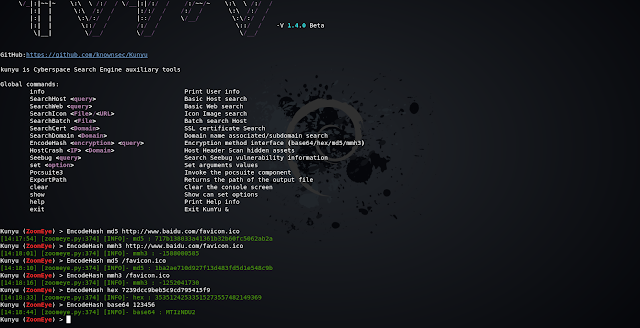
EncodeHash <encryption> <query> Encryption method interface
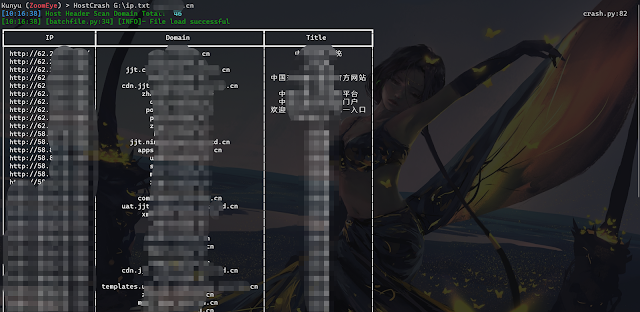
HostCrash <IP> <Domain> Host Header Scan hidden assets
Seebug <Query> Search Seebug vulnerability information
set <Option> Set arguments values
Pocsuite3 Invoke the pocsuite component
ExportPath Returns the path of the output file
clear Clear the console screen
show Show can set options
help Print Help info
exit Exit KunYu &

OPTIONS

ZoomEye:
page <Number> The number of pages returned by the query
dtype <0/1> Query associated domain name/subdomain name
btype <host/web> Set the API interface for batch query

Use case introduction

Here we use the ZoomEye module for demonstration

User information query


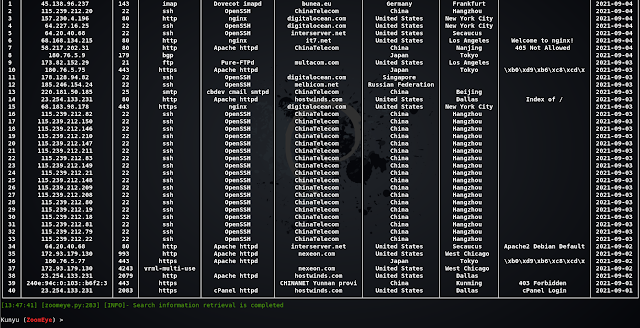
HOST host search


Web host search


Batch IP search


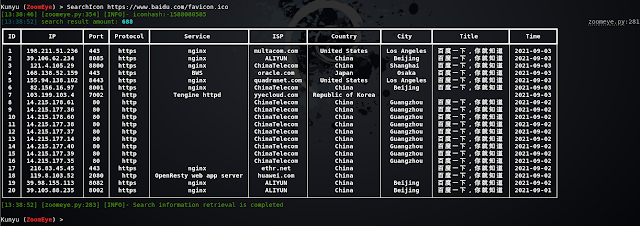
Icon Search

When collecting corporate assets, we can use this method to retrieve the same ico icon assets, which usually has a good effect when associating related corporate assets. But it should be noted that if some sites also use this ico icon, irrelevant assets may be associated (but people who are bored with other people's ico icons are always in the minority). Support url or local file search.


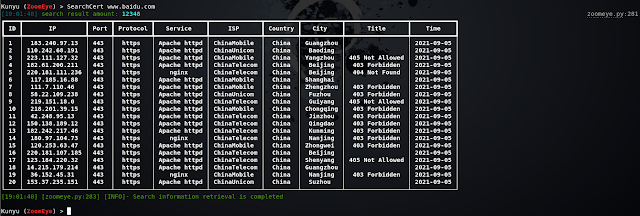
SSL certificate search

Query through the serial number of the SSL certificate, so that the associated assets are more accurate, and services that use the same certificate can be searched. When you encounter an https site, you can use this method.


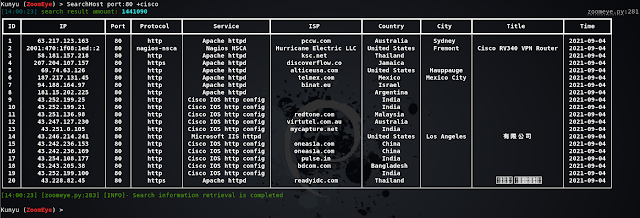
Multi-factor query

Similarly, Kunyu also supports multi-factor conditional query related assets, which can be realized through ZoomEye logic operation syntax.


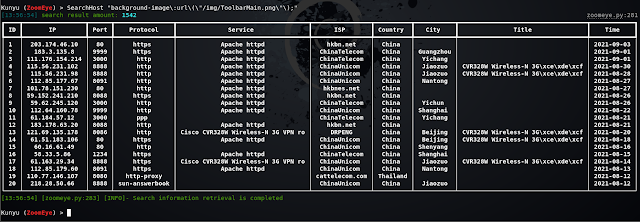
Feature Search

Through HTTP request packet features or website-related features, the same framework assets can be concatenated more accurately


Associated Domain/Subdomain Search

Search for associated domain names and subdomains, and query associated domain names by default. Two modes can be set by setting the dtype parameter.


Encoding hash calculation

In some scenarios, you can use this command to perform common HASH encryption/encoding, such as BASE64, MD5, mmh3, HEX encoding, and debug in this way.


Seebug vulnerability query

You can query historical related vulnerabilities by entering information about the framework and equipment you want to find, but you need to note that only English is supported, and improvements and upgrades will be made later.


Setting parameters

When set page = 2, the returned results are 40. You can modify the page parameter to set the number of pages to be queried. Note that 1 page = 20/items. You can modify the value according to your needs to get more returned results.

The configurable parameters and the current values of the parameters are displayed through show.


Pocsuite linkage

In versions after v1.3.1, you can use kunyu to link the console mode of pocsuite3 for integrated use.


HOSTS head collision

Through the HOSTS collision, the hidden assets in the intranet can be effectively collided, and the intranet service can be accessed according to the ServerName domain name and IP configured in the middleware httpf.conf. This can be achieved by setting the local hosts file later, because the local hosts file takes precedence. The level is higher than DNS server resolution. Support reverse check through ZoomEye domain name library or read TXT file to get the list of domain names.

HOSTS cross collision


Data result

All search results are saved in the user's root directory, and the directory is created based on the current timestamp. All query results of a single start are stored in an Excel format under one directory, giving a more intuitive experience. The output path can be returned through the ExportPath command.


0x04 Loading

​ In fact, there are still many ideas, but as an Alpha version, this is the case, and it will continue to be improved in the later period. I hope that Kunyu can be known to more security practitioners. Thank you for your support.

​ The tool framework has reference to Kunlun Mirror and Pocsuite3, which are all very good works.

​ Thanks to all the friends of KnownSec 404 Team.

“ 看得清 ” 是能力的体现,是 “ 器 ” ,而 “ 看得见 ” 就是思想的体现,那最后关联的是 “ 道 ”。

​ --SuperHei


0x05 Issue

1、Multi-factor search

ZoomEye search can use multi-factor search, dork:cisco +port:80 (note the space) can search all data that meet the conditions of cisco and port:80, if there is no space in between, it is the same search condition, it is that cisco is satisfied and the port is All data for 80. Kunyu's dork does not require quotation marks.

2、High-precision geographical location

ZoomEye gives privileged users high-precision geographic location data, but it should be noted that ordinary users do not have this function, so I hope you know.

3、Username/password login

If you use username/password as the initialization condition, the token will be valid for 12 hours. If you find that your search cannot return data, you may wish to info. If the session times out, the initialization command prompt will be returned. In most cases, we recommend that you use the API KEY method, there is no invalidation problem. This design is also for the security of your account and password. After all, the API KEY can be reset and the token will become invalid. However, with the account and password, it is possible to log in to your ZoomEye account.

4、Cert certificate search

It should be noted that, according to the normal logic, you need to encode the serial number of the target SSL certificate in hexadecimal to match the sentence search, but Kunyu only needs to provide the Domain address to search. The principle is to make a request to the target station to obtain the serial number and process it, but if your host cannot access the target that needs to be searched, it cannot be retrieved. At this time, you can also search with the sentence in the usual way.

5、Favicon icon search

ico icon search not only supports URL retrieval, but also supports local ico icon file search, which has better scalability and compatibility.

6、Query data save path

By default, your query data is in the Kunyu folder under the user directory. You can also use the ExportPath command to query the path in the console mode.

7、Autocomplete

Kunyu's auto-completion supports upper and lower case, command logging, etc., use Tab to complete, please refer to Metasploit for usage.

8. Regarding the error when using pip install kunyu

The following error was reported when using pip install kunyu: File "C:\Users\风起\AppData\Local\Programs\Python\Python37\Scripts\kunyu-script.py", line 1 SyntaxError: Non-UTF-8 code starting with'\xb7' in file C: \Users\风起\AppData\Local\Programs\Python\Python37\Scripts\kunyu-script.py on line 1, but no encoding declared; see http://python.org/dev/peps/pep-0263/ for details

solution: Modify the C:\Users\风起\AppData\Local\Programs\Python\Python37\Scripts\kunyu-script.py file and add # encoding: utf-8 at the beginning of the file.

Then save it and you can use it normally. The bug appears because there is a Chinese name in the user's directory path, which usually appears on windows.

9. Pocsuite3 module POC storage directory

When using the pocsuite3 module, if you want to add a new POC module, you can add a POC file in project directory/kunyu/pocs/.

10. Pocsuite3 module POC missing issue

When using the Pocsuite command linkage, if it is a packaged Kunyu version, the poc has been fixed. At this time, modifying the poc directory cannot add new modules. At this time, you can repackage it or use the project directory/kunyu /console.py Run kunyu to update the poc module in real time.


0x06 Contributions

风起@knownsec 404
wh0am1i@knownsec 404
fenix@knownsec 404
0x7F@knownsec 404


0x07 Community

If you have any questions, you can submit an issue under the project, or contact us through the following methods.

Scan the QR code to add the ZoomEye staff member WeChat, and remark Kunyu, which will draw everyone to the ZoomEye cyberspace surveying and mapping exchange group


Share:

Friday, February 4, 2022

Hashdb-Ida - HashDB API Hash Lookup Plugin For IDA Pro


HashDB IDA Plugin

Malware string hash lookup plugin for IDA Pro. This plugin connects to the OALABS HashDB Lookup Service.


Adding New Hash Algorithms

The hash algorithm database is open source and new algorithms can be added on GitHub here. Pull requests are mostly automated and as long as our automated tests pass the new algorithm will be usable on HashDB within minutes.


Using HashDB

HashDB can be used to look up strings that have been hashed in malware by right-clicking on the hash constant in the IDA disassembly view and launching the HashDB Lookup client.


Settings

Before the plugin can be used to look up hashes the HashDB settings must be configured. The settings window can be launched from the plugins menu Edit->Plugins->HashDB.


Hash Algorithms

Click Refresh Algorithms to pull a list of supported hash algorithms from the HashDB API, then select the algorithm used in the malware you are analyzing.


Optional XOR

There is also an option to enable XOR with each hash value as this is a common technique used by malware authors to further obfuscate hashes.


API URL

The default API URL for the HashDB Lookup Service is https://hashdb.openanalysis.net/. If you are using your own internal server this URL can be changed to point to your server.


Enum Name

When a new hash is identified by HashDB the hash and its associated string are added to an enum in IDA. This enum can then be used to convert hash constants in IDA to their corresponding enum name. The enum name is configurable from the settings in the event that there is a conflict with an existing enum.


Hash Lookup

Once the plugin settings have been configured you can right-click on any constant in the IDA disassembly window and look up the constant as a hash. The right-click also provides a quick way to set the XOR value if needed.


Bulk Import

If a hash is part of a module a prompt will ask if you want to import all the hashes from that module. This is a quick way to pull hashes in bulk. For example, if one of the hashes identified is Sleep from the kernel32 module, HashDB can then pull all the hashed exports from kernel32.


Algorithm Search

HashDB also includes a basic algorithm search that will attempt to identify the hash algorithm based on a hash value. The search will return all algorithms that contain the hash value, it is up to the analyst to decide which (if any) algorithm is correct. To use this functionality right-click on the hash constant and select HashDB Hunt Algorithm.


All algorithms that contain this hash will be displayed in a chooser box. The chooser box can be used to directly select the algorithm for HashDB to use. If Cancel is selected no algorithm will be selected.


Dynamic Import Address Table Hash Scanning

Instead of resolving API hashes individually (inline in code) some malware developers will create a block of import hashes in memory. These hashes are then all resolved within a single function creating a dynamic import address table which is later referenced in the code. In these scenarios the HashDB Scan IAT function can be used.


Simply select the import hash block, right-click and choose HashDB Scan IAT. HashDB will attempt to resolve each individual integer type (DWORD/QWORD) in the selected range.


Installing HashDB

Before using the plugin you must install the python requests module in your IDA environment. The simplest way to do this is to use pip from a shell outside of IDA.
pip install requests

Once you have the requests module installed simply copy the latest release of hashdb.py into your IDA plugins directory and you are ready to start looking up hashes!


Compatibility Issues

The HashDB plugin has been developed for use with the IDA 7+ and Python 3 it is not backwards compatible.


Share:

Smuggler - An HTTP Request Smuggling / Desync Testing Tool


An HTTP Request Smuggling / Desync testing tool written in Python 3


IMPORTANT

This tool does not guarantee no false-positives or false-negatives. Just because a mutation may report OK does not mean there isn't a desync issue, but more importantly just because the tool indicates a potential desync issue does not mean there definitely exists one. The script may encounter request processors from large entities (i.e. Google/AWS/Yahoo/Akamai/etc..) that may show false positive results.


Installation

  1. git clone https://github.com/defparam/smuggler.git
  2. cd smuggler
  3. python3 smuggler.py -h

Example Usage

Single Host:

python3 smuggler.py -u <URL>

List of hosts:

cat list_of_hosts.txt | python3 smuggler.py

Options

usage: smuggler.py [-h] [-u URL] [-v VHOST] [-x] [-m METHOD] [-l LOG] [-q]
[-t TIMEOUT] [--no-color] [-c CONFIGFILE]

optional arguments:
-h, --help show this help message and exit
-u URL, --url URL Target URL with Endpoint
-v VHOST, --vhost VHOST
Specify a virtual host
-x, --exit_early Exit scan on first finding
-m METHOD, --method METHOD
HTTP method to use (e.g GET, POST) Default: POST
-l LOG, --log LOG Specify a log file
-q, --quiet Quiet mode will only log issues found
-t TIMEOUT, --timeout TIMEOUT
Socket timeout value Default: 5
--no-color Suppress color codes
-c CONFIGFILE, --configfile CONFIGFILE
Filepath to the configuration file of payloads

Smuggler at a minimum requires either a URL via the -u/--url argument or a list of URLs piped into the script via stdin. If the URL specifies https:// then Smuggler will connect to the host:port using SSL/TLS. If the URL specifies http:// then no SSL/TLS will be used at all. If only the host is specified, then the script will default to https://

Use -v/--vhost <host> to specify a different host header from the server address

Use -x/--exit_early to exit the scan of a given server when a potential issue is found. In piped mode smuggler will just continue to the next host on the list

Use -m/--method <method> to specify a different HTTP verb from POST (i.e GET/PUT/PATCH/OPTIONS/CONNECT/TRACE/DELETE/HEAD/etc...)

Use -l/--log <file> to write output to file as well as stdout

Use -q/--quiet reduce verbosity and only log issues found

Use -t/--timeout <value> to specify the socket timeout. The value should be high enough to conclude that the socket is hanging, but low enough to speed up testing (default: 5)

Use --no-color to suppress the output color codes printed to stdout (logs by default don't include color codes)

Use -c/--configfile <configfile> to specify your smuggler mutation configuration file (default: default.py)


Config Files

Configuration files are python files that exist in the ./config directory of smuggler. These files describe the content of the HTTP requests and the transfer-encoding mutations to test.

Here is example content of default.py:

def render_template(gadget):
RN = "\r\n"
p = Payload()
p.header = "__METHOD__ __ENDPOINT__?cb=__RANDOM__ HTTP/1.1" + RN
# p.header += "Transfer-Encoding: chunked" +RN
p.header += gadget + RN
p.header += "Host: __HOST__" + RN
p.header += "User-Agent: Mozilla/5.0 (Windows NT 10.0; Win64; x64) AppleWebKit/537.36 (KHTML, like Gecko) Chrome/78.0.3904.87 Safari/537.36" + RN
p.header += "Content-type: application/x-www-form-urlencoded; charset=UTF-8" + RN
p.header += "Content-Length: __REPLACE_CL__" + RN
return p


mutations["nameprefix1"] = render_template(" Transfer-Encoding: chunked")
mutations["tabprefix1"] = render_template("Transfer-Encoding:\tchunked")
mutations["tabprefix2"] = render_template("Transfer-Encoding\t:\tchunked")
mutations["space1"] = render_template("Transfer-Encoding : chunked")

for i in [0x1,0x4,0x8,0x9,0xa,0xb,0xc,0xd,0x1F,0x20,0x7f,0xA0,0xFF]:
mutations["midspace-% 02x"%i] = render_template("Transfer-Encoding:%cchunked"%(i))
mutations["postspace-%02x"%i] = render_template("Transfer-Encoding%c: chunked"%(i))
mutations["prespace-%02x"%i] = render_template("%cTransfer-Encoding: chunked"%(i))
mutations["endspace-%02x"%i] = render_template("Transfer-Encoding: chunked%c"%(i))
mutations["xprespace-%02x"%i] = render_template("X: X%cTransfer-Encoding: chunked"%(i))
mutations["endspacex-%02x"%i] = render_template("Transfer-Encoding: chunked%cX: X"%(i))
mutations["rxprespace-%02x"%i] = render_template("X: X\r%cTransfer-Encoding: chunked"%(i))
mutations["xnprespace-%02x"%i] = render_template("X: X%c\nTransfer-Encoding: chunked"%(i))
mutations["endspacerx-%02x"%i] = render_template("Transfer-Encoding: chunked\r%cX: X"%(i))
mutations["endspacexn-%02x"%i] = render_template("Transfer-Encoding: chunked%c\nX: X"%(i))

There are no input arguments yet on specifying your own customer headers and user-agents. It is recommended to create your own configuration file based on default.py and modify it to your liking.

Smuggler comes with 3 configuration files: default.py (fast), doubles.py (niche, slow), exhaustive.py (very slow) default.py is the fastest because it contains less mutations.

specify configuration files using the -c/--configfile <configfile> command line option


Payloads Directory

Inside the Smuggler directory is the payloads directory. When Smuggler finds a potential CLTE or TECL desync issue, it will automatically dump a binary txt file of the problematic payload in the payloads directory. All payload filenames are annotated with the hostname, desync type and mutation type. Use these payloads to netcat directly to the server or to import into other analysis tools.


Helper Scripts

After you find a desync issue feel free to use my Turbo Intruder desync scripts found Here: https://github.com/defparam/tiscripts DesyncAttack_CLTE.py and DesyncAttack_TECL.py are great scripts to help stage a desync attack


License

These scripts are released under the MIT license. See LICENSE.


Share:

Thursday, October 18, 2018

Raccoon - A High Performance Offensive Security Tool For Reconnaissance And Vulnerability Scanning


Offensive Security Tool for Reconnaissance and Information Gathering.

Features
  • DNS details
  • DNS visual mapping using DNS dumpster
  • WHOIS information
  • TLS Data - supported ciphers, TLS versions, certificate details, and SANs
  • Port Scan
  • Services and scripts scan
  • URL fuzzing and dir/file detection
  • Subdomain enumeration - uses Google Dorking, DNS dumpster queries, SAN discovery, and brute-force
  • Web application data retrieval:
    • CMS detection
    • Web server info and X-Powered-By
    • robots.txt and sitemap extraction
    • Cookie inspection
    • Extracts all fuzzable URLs
    • Discovers HTML forms
    • Retrieves all Email addresses
  • Detects known WAFs
  • Supports anonymous routing through Tor/Proxies
  • Uses asyncio for improved performance
  • Saves output to files - separates targets by folders and modules by files

Roadmap and TODOs
  • Support multiple hosts (read from the file)
  • Rate limit evasion
  • OWASP vulnerabilities scan (RFI, RCE, XSS, SQLi etc.)
  • SearchSploit lookup on results
  • IP ranges support
  • CIDR notation support
  • More output formats

About
A raccoon is a tool made for reconnaissance and information gathering with an emphasis on simplicity.
It will do everything from fetching DNS records, retrieving WHOIS information, obtaining TLS data, detecting WAF presence and up to threaded dir busting and subdomain enumeration. Every scan outputs to a corresponding file.
As most of Raccoon's scans are independent and do not rely on each other's results, it utilizes Python's asyncio to run most scans asynchronously.
Raccoon supports Tor/proxy for anonymous routing. It uses default wordlists (for URL fuzzing and subdomain discovery) from the amazing SecLists repository but different lists can be passed as arguments.
For more options - see "Usage".

Installation
For the latest stable version:
pip install raccoon-scanner
Or clone the GitHub repository for the latest features and changes:
git clone https://github.com/evyatarmeged/Raccoon.git
cd Raccoon
python raccoon_src/main.py

Prerequisites
Raccoon uses Nmap to scan ports as well as utilizes some other Nmap scripts and features. It is mandatory that you have it installed before running Raccoon.
OpenSSL is also used for TLS/SSL scans and should be installed as well.

Usage
Usage: raccoon [OPTIONS]

Options:
  --version                      Show the version and exit.
  -t, --target TEXT              Target to scan  [required]
  -d, --dns-records TEXT         Comma separated DNS records to query.
                                 Defaults to: A,MX,NS,CNAME,SOA,TXT
  --tor-routing                  Route HTTP traffic through Tor (uses port
                                 9050). Slows total runtime significantly
  --proxy-list TEXT              Path to proxy list file that would be used
                                 for routing HTTP traffic. A proxy from the
                                 list will be chosen at random for each
                                 request. Slows total runtime
  --proxy TEXT                   Proxy address to route HTTP traffic through.
                                 Slows total runtime
  -w, --wordlist TEXT            Path to wordlist that would be used for URL
                                 fuzzing
  -T, --threads INTEGER          Number of threads to use for URL
                                 Fuzzing/Subdomain enumeration. Default: 25
  --ignored-response-codes TEXT  Comma separated list of HTTP status code to
                                 ignore for fuzzing. Defaults to:
                                 302,400,401,402,403,404,503,504
  --subdomain-list TEXT          Path to subdomain list file that would be
                                 used for enumeration
  -S, --scripts                  Run Nmap scan with -sC flag
  -s, --services                 Run Nmap scan with -sV flag
  -f, --full-scan                Run Nmap scan with both -sV and -sC
  -p, --port TEXT                Use this port range for Nmap scan instead of
                                 the default
  --tls-port INTEGER             Use this port for TLS queries. Default: 443
  --skip-health-check            Do not test for target host availability
  -fr, --follow-redirects        Follow redirects when fuzzing. Default: True
  --no-url-fuzzing               Do not fuzz URLs
  --no-sub-enum                  Do not bruteforce subdomains
  -q, --quiet                    Do not output to stdout
  -o, --outdir TEXT              Directory destination for scan output
  --help                         Show this message and exit.

Screenshots

HTB challenge example scan:


Results folder tree after a scan:


Share:
Copyright © Offensive Sec Blog | Powered by OffensiveSec
Design by OffSec | Theme by Nasa Records | Distributed By Pirate Edition